Tutorial: Making thread belt loops with Nancy Zieman (and 3 ways to use them)
Nancy Zieman is one of my sewing heroes. From the wonderfully clear writing in her books to her fantastic TV shows, she’s done a lot to bring the craft of sewing into our homes. So I’m thrilled to be the final stop on the blog tour for her newest book, Nancy Zieman’s Sewing A to Z.
This is a really cool reference book because it’s arranged alphabetically, making it really easy to find various techniques. It has a clear and clean layout with excellent illustrations, just like Nancy’s other books.
One of the techniques that caught my eye was this super easy way to make belt loops out of thread. You see these types of belt loops often on vintage garments. They’re nice because they don’t stand out too much and they’re very quick to create. But I immediately thought of other handy uses for them!
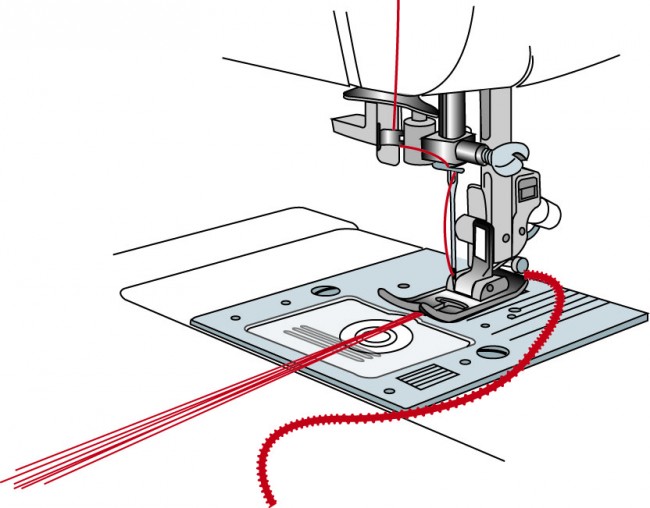
To make them, change your stitch to zig zag, use a stitch width of 4 and a stitch length of 1. Simply zig zag over six strands of thread while holding them taut, as shown in the illustration above (from the book).
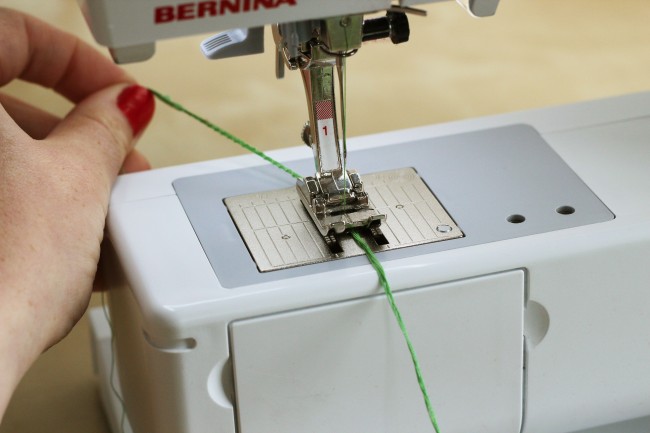
We tried it out in the studio, and it was fast and easy. When sewing the thread loop, pull on both ends of the threads while sewing slowly. This helps you keep them in place as the needle zig zags over them.
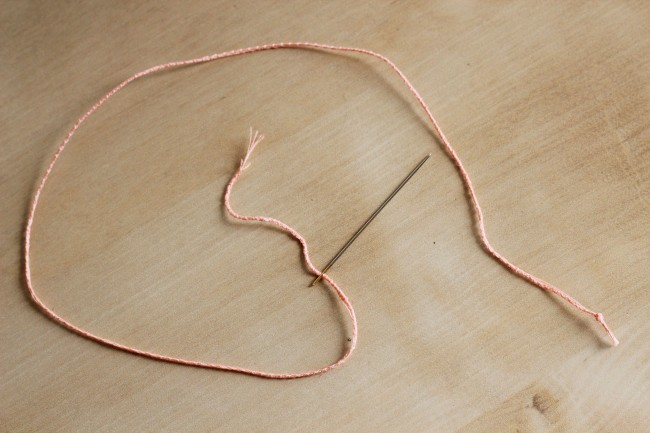
With a large eye needle, thread the thread loop through the eye. This is a little tricky and might take a bit of working to pull it through.
Here are my ideas for using them:
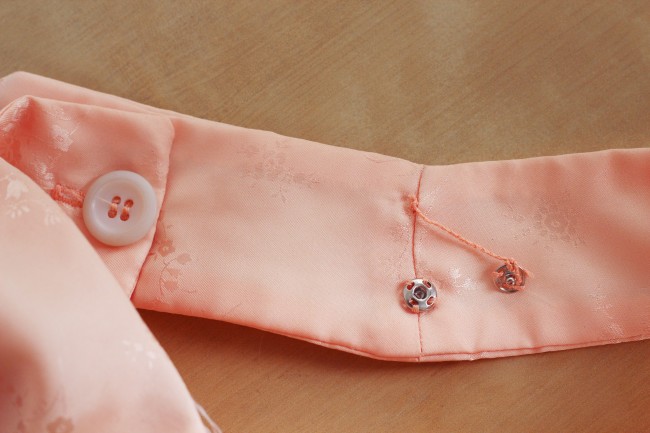
1. Lingerie guards: The thread loop is excellent for making lingerie guards on the inside of a shoulder seam. Make sure you use a snap on the other end. These lingerie straps go around your bra strap, making sure it doesn’t slip out.
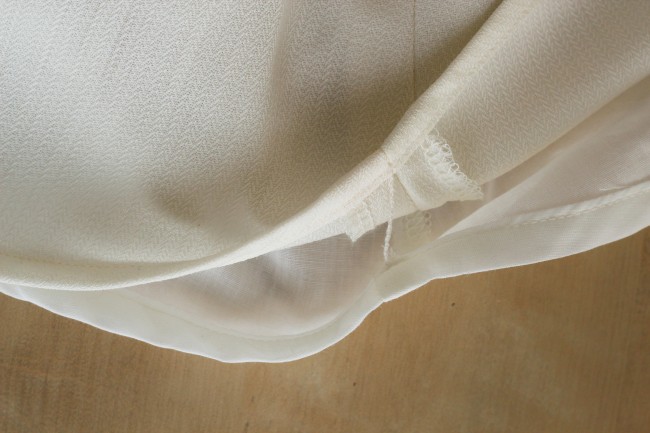
2. French tacks for lined garments: You can also use the thread loop to make an easy version of a French tack. A French tack is a short, somewhat elastic bit of sewn or knotted thread that attaches a lining to the outer garment. That prevents the lining from riding up or twisting. There are various traditional ways to make a
French tack, but you could also just use the method shown above. Simply leave about 3/4″ of thread between the lining and the garment.
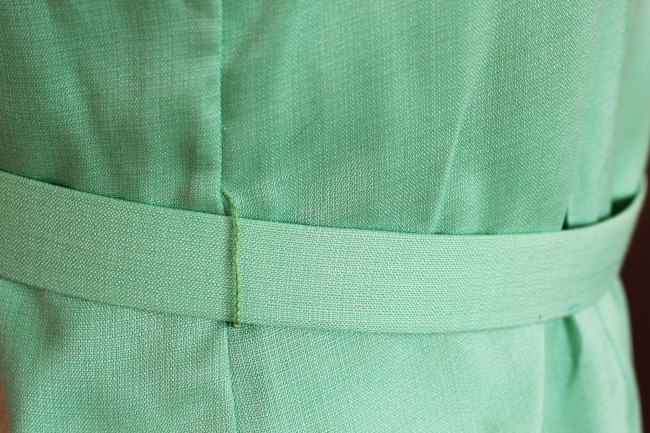
3. Belt loops: Finally, the original purpose of this method, belt loops. Before you sew the side seams on a dress, place the thread loops at the waist. Sew up the sides as usual. Now you have small belt loops ready for your handmade or store bought belt. If your dress doesn’t have side seams, simply sew the belt loops in with a needle. Make sure you measure the width of the belt and leave a little extra room.
Nancy is also giving away a wonderful prize of several books and notions worth $450 to celebrate the release of this book! All you have to do is head over to her blog post and leave a comment (don’t leave it here, the giveaway is over there!)
You can visit the other stops on the blog tour as well, listed below. Some of these blogs are new to me and have been great discoveries, so check them out!
08/15 – Nancy Zieman’s blog
08/16 – Whipstitch
08/17 – Sew Mama Sew
08/18 – Diary of a Quilter
08/20 – Amy’s Creative Side
08/22 – Quiltville
08/23 – Crap I’ve Made
08/24 – Eileen Roche’s blog
08/25 – I’m Just a Guy Who Quilts
08/26 – The Free Motion Quilting Project
08/27 – Sew Serendipity
08/29 – Lazy Girls Designs
08/30 – Pat Sloan Blog
08/31 – Tallgrass Prairie Studio
09/01 – True Up
09/02 – Sew News
09/06 – Off the Cuff Sewing Style
09/07 – V and Co.
09/08 – The Cottage Home

 Sign In


Comments
Casey
September 9, 2011 #
Brilliant! I love adding lingerie stays or belt loops to my sewing, but it’s one of those things that takes f-o-r-e-v-e-r to do by hand (or maybe it’s just because it’s one of the last steps in finishing a garment it always seems to take longer? lol.). Going to try this soon! :)
Sarai
September 9, 2011 #
I love them too, they’re such a nice touch. I’ve also seen them made with very narrow twill tape, but I think these are even easier!
Lavender
September 9, 2011 #
What Casey said! These are always sooo slow going when I save them for the final, handsewn, step.
CamberwellGal
September 9, 2011 #
Gosh that is so straightforward and easy, and so very useful. I’m so off to mend/retro-fit these to so many of my garments! Thank you Sarai for posting about these, and Nancy Zieman for such a very clear explanation.
Nancy Zieman
September 9, 2011 #
Sarai, thank you for the great posting! I’m delighted that you took time to stitch, photo, and post the thread loop technique! My best to you, NZ
Sarai
September 9, 2011 #
Thanks Nancy, this book really is so wonderful and clearly written, but of course that is exactly what I would expect.
raquel
September 9, 2011 #
Great post! Nice addition to my sewing skills
Seraphinalina
September 9, 2011 #
Oh that looks so easy! It’s a lovely addition to a garment, really taking it up a notch and yet not really adding that much fuss or time. Thanks for the tutorial.
Sandy
September 9, 2011 #
Thanks for the great post. I will have to try this. It is such an easy way to make loops, why didn’t I think of this?
Sarai
September 9, 2011 #
That was my thought as well. I love simple solutions like this!
Barbara Slavin
September 9, 2011 #
Thanks for sharing this! Lingerie guards are a brilliant idea…
Kate
September 9, 2011 #
Excellent! Problem solved..
Sarah Jane
September 9, 2011 #
I’ve seen these as belt loops, lingerie guards and French tacks on dresses I’ve bought from commercial brands. They are wonderful details that make these dresses awesomer. I’m happy to know the trick for myself now too :D
jen
September 9, 2011 #
this is so cool, i’ve never seen this technique. when i make threaded belt loops, i just finger crochet them.
Sarai
September 9, 2011 #
That’s how I’ve done French tacks as well. It’s nice to see how they can be done by machine.
Krystina
September 9, 2011 #
Ooo these lingerie ties on my new Sorbetto top would be fabulous!
Cat
September 9, 2011 #
Ah… I do love simple, timeless genius. Definitely going to use this – thanks!
Melinda
September 9, 2011 #
I came for the book tour, but I love your fall dress-the cut, the fabric, everything! I’m just now getting into quilting and sewing and this book is going to make a great reference. Thanks for the review!
aeble (Tammy)
September 9, 2011 #
Great tips and so much faster than what I’ve been doing currently! Now I have no excuse to not raise the belt loops on my shirt dresses. Really looking forward to having a copy of this book, even if I’m not a lucky winner of it.
Celly
September 9, 2011 #
Looks like a cute book! Thanks
Amanda
September 10, 2011 #
Wow, this is an awesome technique. I love the lingerie guards and feel like I need to add those to all my RTW thin-strapped tops as well as me-made items! I’ve done French tacks before and this is a nice quick alternative (and you can make them in bulk!).
ching
December 11, 2011 #
Hi Sarai (and Nancy too of course), thank you for sharing this technique! I just used it today for a skirt lining and it turned out great! :D
Toupporie
February 14, 2012 #
Incredibile argomento
Mikgirl
February 17, 2012 #
Thank you for this post! I’m glad I found this before I try to tackle it by hand stitching! It was very easy and fast. :)
Julie
March 19, 2012 #
Thanks so much for the helpful tutorial. I’ve wanted to know how to do this for a long time. They rarely fall where they should on me with store bought clothing.
Juliette from Sewing And Style Den
April 16, 2012 #
My mom has always used the thread belt loops she mades by hand, kind of a braid- but now that I live a thousand miles away, she is not there to remind me the technique- so this trick is what I have been looking for!!!! Thank you- shared on Sewing and style Den Facebook too!
Barb
July 10, 2012 #
You can also crochet 6 strands of thread, pull through the area you wish the belt loop tone and tie off on the back side.
Barb
July 10, 2012 #
You can also crochet with a chain stitch, 6 strands of thread and pull through where you wish the belt loop to be and tie off on the back side.
stigreE
September 25, 2012 #
rGcczdzb – generique bactrim ; Bactrim en ligne, fDaazaub bactrim forte 960 . antibiotique pas cher . kssvvy5i Bactrim sans ordonnance trimethoprim ds ; sOcrnzys
xprofilejobs
November 3, 2012 #
Natasha
December 1, 2012 #
This saved me a heap of time. Thanks! Will be also teaching this technique to my Textiles students next year!
Jacqs
December 20, 2012 #
Thanks for clarifying how to make these! I have these loops on my jacket and I had no idea how to fix the one side that has broken. In the end, however, I didn’t fancy threading the bobbin, and otherwise setting up the machine to make these strings. As I have lots of embroidery floss on hand, all I did was take three lengths of floss in the right colour and braid them together, then tied knots on each end and sewed the loops onto my coat using the knots. It likely ended up being stronger, and possibly faster once you factor in the time it would take to get the machine set up and bobbin wound. On the other hand, I can see the above “strings” would be better with more delicate fabrics and projects like that. Thanks again!
Cath
January 17, 2013 #
LOVE this tip!
Gonna try it as soon as I can!!!!
Barbara
June 4, 2013 #
I crochet a single strand of quilting thread with my fingers to make loops. This idea might have a classier look.
Catherine
June 5, 2013 #
I show a picture of my successful attempt on Pinterest – I used embroidery floss as my “6 strands” and was very pleased with how it turned out. Thank you for posting this tutorial!
http://pinterest.com/pin/207587864047109869/
Ivona
August 26, 2013 #
What a saver! I was clueless and this was easy peasy – also very pretty looking :)
Thank you!
Kathy
September 22, 2013 #
this did not work for me at all. All I got was a big mess of thread. My presser foot did not even hold the thread down. I was quite disappointed that this did not work for me. (BTW, I am using a brand new sewing machine for this.). I even tried to bring the width of the stitch down to 1.0 because I thought 4 was just too wide but that didn’t work either. If you have any suggestions, I’d sure love to hear them.
xsereight
June 7, 2014 #
Helo , male enhancement pills!
mjt
nav
oa
I would also like to add that in case you do not now have an insurance policy or you do not belong to any group insurance, you could well reap the benefits of seeking the assistance of a health insurance professional. Self-employed or individuals with medical conditions normally seek the help of a health insurance broker. Thanks for your blog post.
male enhancement natural products
http://treatmalegra.verifiedrugs.com