Arrowhead Tack Tutorial
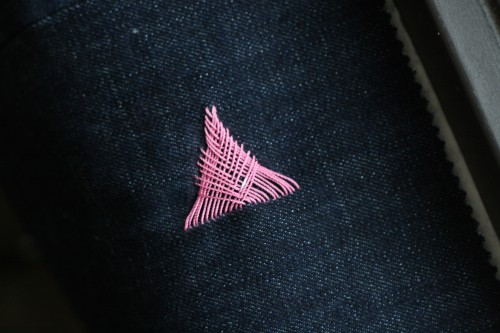
Today we have a sweet little tutorial featuring arrowhead tacks inspired by McCall’s Sewing Book. Tacks are decorative reinforcements used on the right side of the fabric at the ends of the pockets, seams, or pleats. Of course, arrowhead tacks are super cute and can simply be added to a garment just for looks, if you’re so inclined. Here’s some arrowhead inspiration via Etsy…
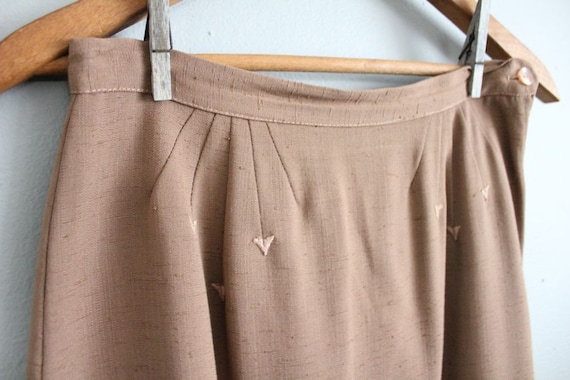
Vintage skirt with arrowhead tacks adorning pleats by Allen Company Inc.
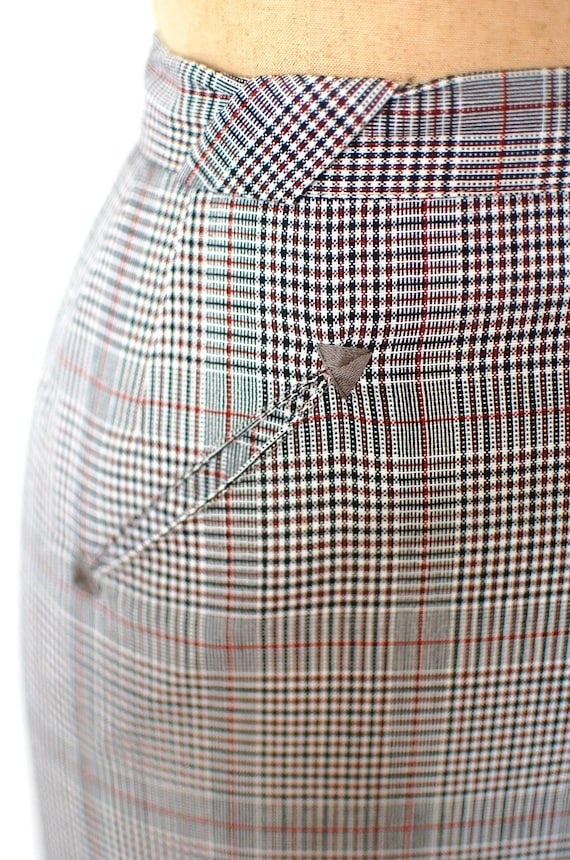
Vintage skirt with reinforced pocket tacks by 13bees
You will need:
- embroidery floss
- embroidery needle
- scrap of bottom weight fabric like wool or denim
- ruler
- tailor’s chalk
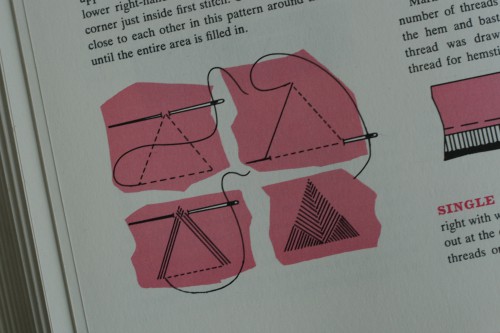
Sometimes diagrams are easier to understand than pictures, so here’s a glimpse at the steps in McCall’s Sewing Book.
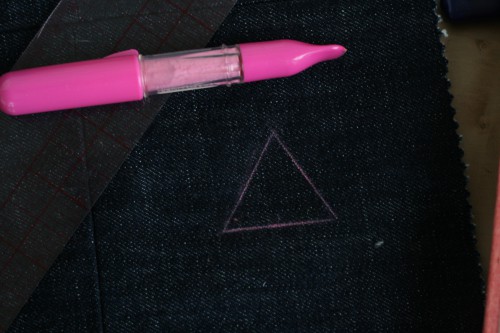
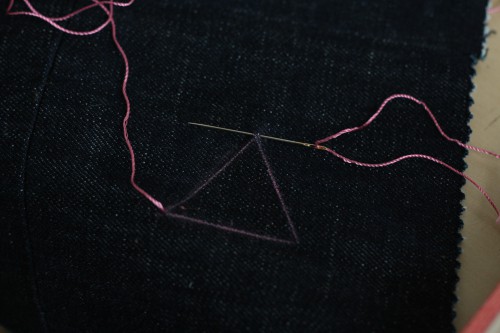
Step 1: Using a ruler and tailor’s chalk, draw the outline of a triangle on your scrap fabric.
Step 2: Thread your embroidery needle with embroidery floss. Don’t knot the end of your floss, just allow a few inches of floss to peak out the eye of your needle.
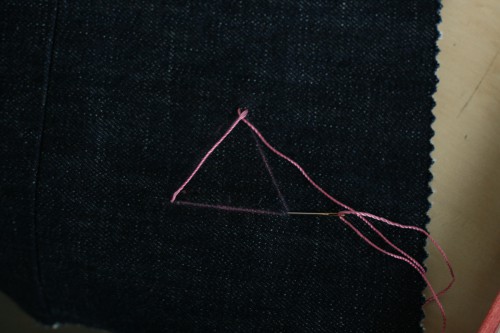
Step 3: From the wrong side of the fabric, insert the needle into the lower left-hand corner of the triangle. Then, make a small stitch at the upper corner from right to left.
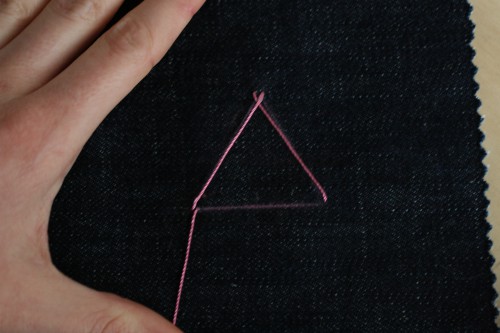
Step 4: Pull thread taut. Then, insert needle in lower right-hand corner.
Step 5: Re-insert tip of the needle through the wrong side of the fabric at the lower left-hand corner.
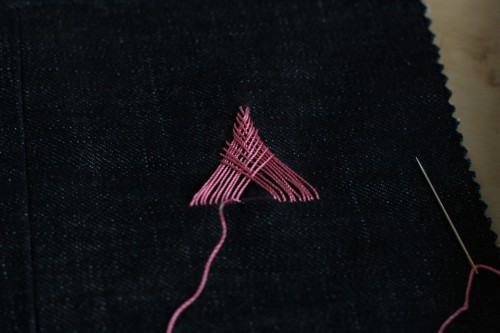
Step 6: Repeat steps until the entire area is filled in, moving downward from the top point of the arrow. Tie off your thread and your arrowhead is complete!
We’ve made ours extra large to show you the stitches, but you can make small, close stitches like the vintage tacks above. Once you’ve mastered an arrowhead tack on scrap fabric, try incorporating it into a garment’s design or use it to reinforce delicate seams.

 Sign In


Comments
Lauren
April 8, 2011 #
love this!! i’m planning on making a western shirt – complete with hand-embroidered yoke, deep contrasting cuffs, piping, welt pockets, and pearl snaps (and when i say “planning,” i mean i already have the pattern & fabric, just have to tweak the fit first!)- and it will be my first time doing arrowhead tacks, so this is really helpful :)
The Cupcake Goddess
April 8, 2011 #
What a fabulous idea! I love this and had actually never even thought to use it before! Clever! Totally fun and looks like a fancy tailoring technique! Thanks for the tutorial!
xoxo,
Sunni
Carolyn
April 8, 2011 #
What a great little tutorial! I’m definitely bookmarking this!
Also, may I ask where your tailors chalk pen-thingy is from? It makes such a wonderfully narrow line, I could really use one (or several) of those!
Thanks again for the nifty tutorial, I think I have a pattern for a vintage skirt with darts similar to the first etsy example. This would be a great embellishment.
Rachel
April 8, 2011 #
Hmm, I’m not sure where Sarai found the chalk wheel, but I did find quite a few similar styles just by googling “chalk wheel”. When in doubt, check the local fabric shop!
Good luck!
Caroline
April 9, 2011 #
I found this!
http://www.clover-usa.com/product/69424/4710A/_/Pen_Style_Chaco_Liners
I have never seen this in the local fabric shops I frequent (which are somewhat lame). I might have to go to a quilting shop or order one online.
lsaspacey
April 8, 2011 #
Rachel, I am SO loving these types of vintage tutorials. Please keep ’em coming!
Rachel
April 8, 2011 #
Yes ma’am!
Tilia
April 8, 2011 #
Oh! This is called flossing in corsetry. They can add such lovely detail to a piece. Love them.
Caroline
April 8, 2011 #
I have to second Carolyn’s question of where you got that handy chalk marker! I’ve got one that is similar but the jagged wheel is much larger so it’d be cool get a nimbler one.
allison
April 8, 2011 #
Hi,
Just wondering if I can use buttonhole silk for this to? or would it be too bulky and thick?
Allison
Rachel
April 8, 2011 #
I’m not sure about buttonhole silk, but it’s worth a try!
Carolyn
April 10, 2011 #
I bet it would look gorgeous!
Marieke
April 8, 2011 #
I can’t CAN’T wait to put this into practice!! Thanks for sharing :) :)
Brittan
April 9, 2011 #
This is adorable!! I love it! Thanks :)
Garnet
April 9, 2011 #
I’ve loved these little triangles of heaven forever, but I’ve never actually incorporated one into a project. Perhaps, now, the time has come.
Garnet
Catholic Bibliophagist
April 9, 2011 #
What happens to the loose end of your thread (which you haven’t knotted)?
Tracy McElfresh
September 10, 2011 #
I looked all over for how to make arrows for my caplet’s hidden pockets I’m stitching on and I was so happy to find them done simply and easily understood here.
Thank you,
Tracy
Debbie
May 19, 2013 #
Thank you for reminding me of this technique. My great aunt, who was a dressmaker in the 30’s showed me, years ago, how to work these and I had completely forgotten.
Diane
June 25, 2013 #
Thanks! I was looking for arrows for a western shirt in a cellophane package as described on the pattern I have,with no luck. This is immensely helpful and informative, also doable. Thanks again!
diane
May 1, 2014 #
i love the details in LADYBIRDS polkadot peter and the wolf pants.my westernshirt is going to be with various asian inspired prints