
 Sign In

Tutorial: Ginger Waistband with Flat Piping
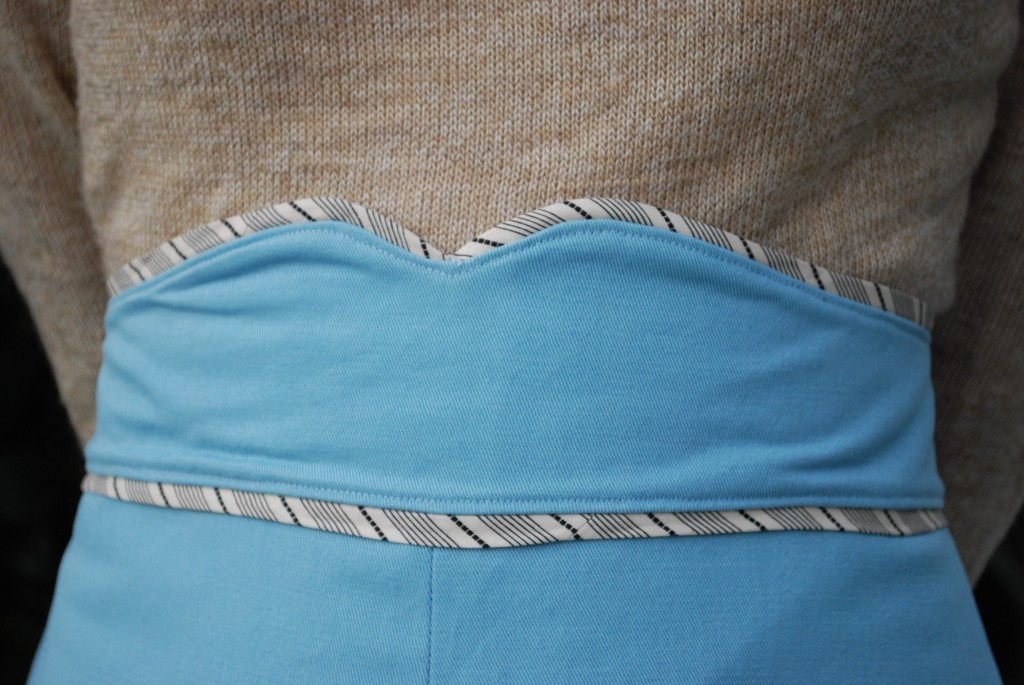
A-line skirts are a sweet spring staple and look even sweeter with contrasting piping at the waistband. Easier to make than corded piping, this type of piping doesn’t include a cord and is referred to as flat piping. This technique can easily be added to any of the three waistband styles for our Ginger pattern, but we tackled the more challenging shape to prepare you for all waistbands in the near future. After adding piping to the heart shaped dip of this waistband, everything else will be a piece of cake!
You will need:
-strip of fabric made using the continuous bias tape tutorial
-pattern and necessary supplies
-invisible zipper foot
-regular zipper foot
-pen or fabric marker
-fabric sheers
-ruler

Step 1: Make 1″ fabric strips with the continuous bias tape tutorial, but don’t run it through the bias tape maker. Instead, just press the strip in half with raw edges aligned.

Step 2: Apply interfacing to wrong side of waistband pieces and sew together at 5/8″. Trim seam allowances and press open. This is the outer waistband. Sew and trim the remaining waistband pieces in the same way. These aren’t interfaced and are the inner waistband pieces.

Step 3: Use a ruler to mark 3/8″ all along the top and bottom edge of both waistbands, then carefully cut that 3/8″ off.

Step 4: On the right side, pin piping in place with raw edges aligned at the top of the outer waistband piece. When you get to the center front with the heart shaped dip, allow the piping to reach a few extra inches on either side of the dip. Cut here and start a new piece of piping along the remaining top edge. Then, pin piping to the bottom edges of outer waistband piece.

Step 5: Baste piping in place at 1/8″ leaving a two inch gap at the centerfront.
Step 6: Assemble the skirt body. Trim the waist seam allowance 3/8″ using the method described in step 3.

Step 7: Pin outer waistband to skirt body with right sides together, making sure seams and centerfront match. Sew with 1/4″ seam allowance.

Step 8: Install invisible zipper.

Step 9: Turn bottom edge of the inner waistband up 1/4″ and press.

Step 10: Turn skirt right side out. Then, turn zipper out at the waistband so the zipper tape is facing outward.

Step 11: With right sides together, pin ends of the inner waistband to outer waistband just above piping. It should cover of the zipper tape. Make sure the 1/4″ we pressed up is still in position and neatly aligned just above the piping.

Step 12: Sew with regular zipper foot along outside edge of zipper teeth.

Step 13: Sew along the top edge of inner and outer waistbands together at 1/4″, leaving a 2″ gap at the heart shaped dip. The piping ends should still remain unsewn.

Step 14: Flip waistband right side out using a point turner in the corners. For tips using a point turner, look here. Press waistband.

Step 15: The next steps may seem confusing, but it’s really just a matter of using your fingers to make the piping lay flat. Okay, match the raw edges of the loose piping to the edge of the waistband.

Step 16: Using your fingers, turn the piping and waistband edge inside about 1/4″ and pin in place. The piping should taper off at the centerfront dip.

Step 17: Repeat with the remaining loose piping.


Step 18: Flip skirt over and press the inner waistband edge under 1/4″ so raw edges aren’t showing.

Step 19: Edgestitch along the top of the outer waistband, pulling the inner waistband taut.


Step 20: On the right side of the outer waistband, just edgestitch along the bottom edge making sure to catch the inner waistband so all raw edges are enclosed within the waistband. Press waistband and you’re done!
Comments
Stephanie
July 7, 2011 #
What a great tutorial! I’ve never heard of flat piping before but it looks great!
Sarai
July 7, 2011 #
I’ve seen it quite a bit on more modern clothing (like some dresses and tops at Anthopologie), more so than vintage. I think it’s a really nice look.
Casey
July 7, 2011 #
Very cute! I tend to like to emphasize my waist and this is a great way to do it with a bit of flair! Adding to my “try soon!” list of sewing techniques. :)
Sarai
July 7, 2011 #
Yeah, it’s a great addition for emphasizing a certain area! I like it on necklines, because it draws attention to the face.
Jill Flory
July 7, 2011 #
Great tutorial:) Piping is an interesting thing to learn! Very, very cute addition to any garment.
lsaspacey
July 7, 2011 #
Wow, that is beautiful. Thanks Rachel!
allie mae
July 7, 2011 #
awesome tutorial!! thanks for the info! can’t wait to try it out!
Christine
August 1, 2011 #
Oh I love the look of the custom made piping with this skirt! I think I need to make another Ginger and try this out…
Super Bloomers
August 30, 2011 #
My gosh. This is amazing! Thank you so much for this wonderful tutorial! The waistband looks absolutely lovely.
Kim
July 11, 2012 #
This is great! I really like the contrast it makes. Will definitely try this on a garment in the new future! Thanks
Signe Marie
November 5, 2012 #
I just finished a grey wool skirt with bright yellow flat piping. It was really easy, thanks to you!
dani
August 29, 2013 #
you make adding the piping look manageable…it really makes the the skirt look finished. you have wonderful tutorials. thank you for sharing.
Caitlin Ahern
January 21, 2014 #
How would the instructions/measurements change if I were to sew in corded piping? I have some store-bought corded piping that I’d like to use. It’s the usual, 1/2″ kind like this:
http://www.123stitch.com/item/Wrights-Bias-Tape-Corded-Maxi-Piping-12-87-Brick/WRT-1173030087
Thanks in advance!
Lyric
April 11, 2014 #
Stupendous! Thank you. ;-)