
 Sign In

How to create decorative topstitched details
We recently shared a whole lot of topstitching inspiration. It’s a simple technique that you can use to add subtle detail to a seam, or dramatic texture to entire areas of a garment.
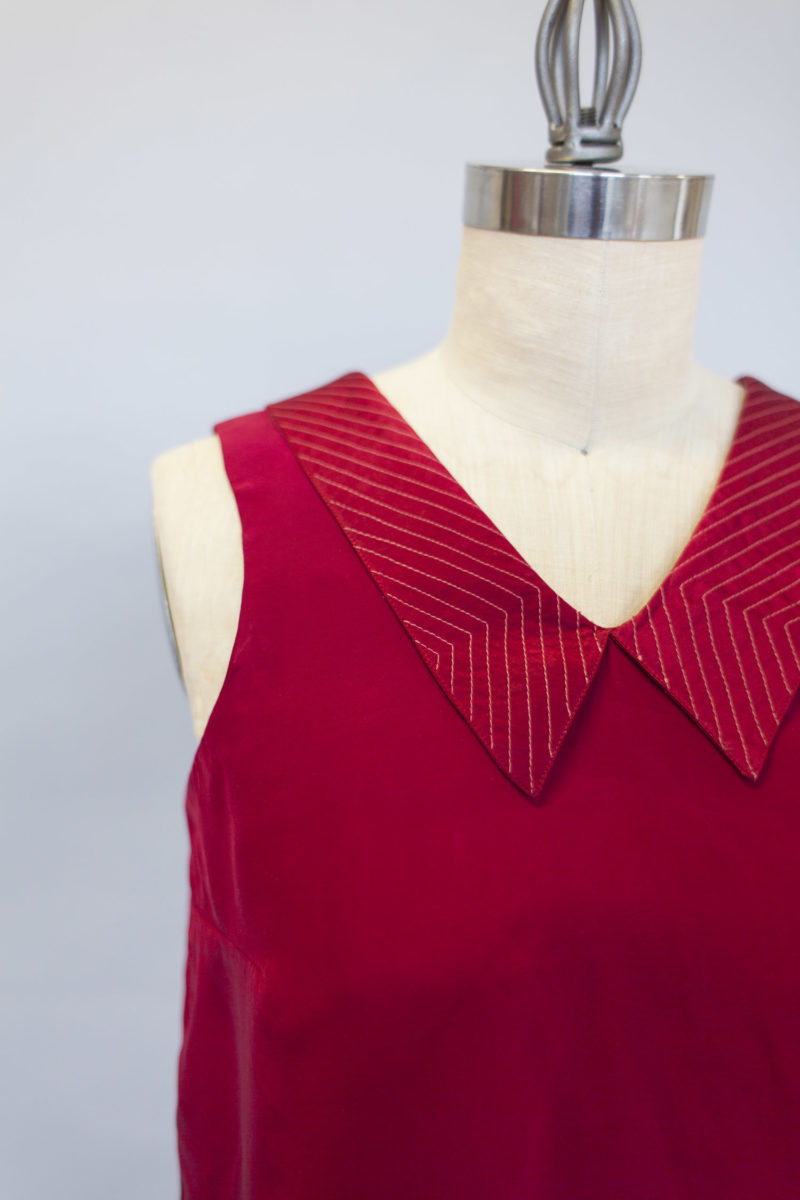
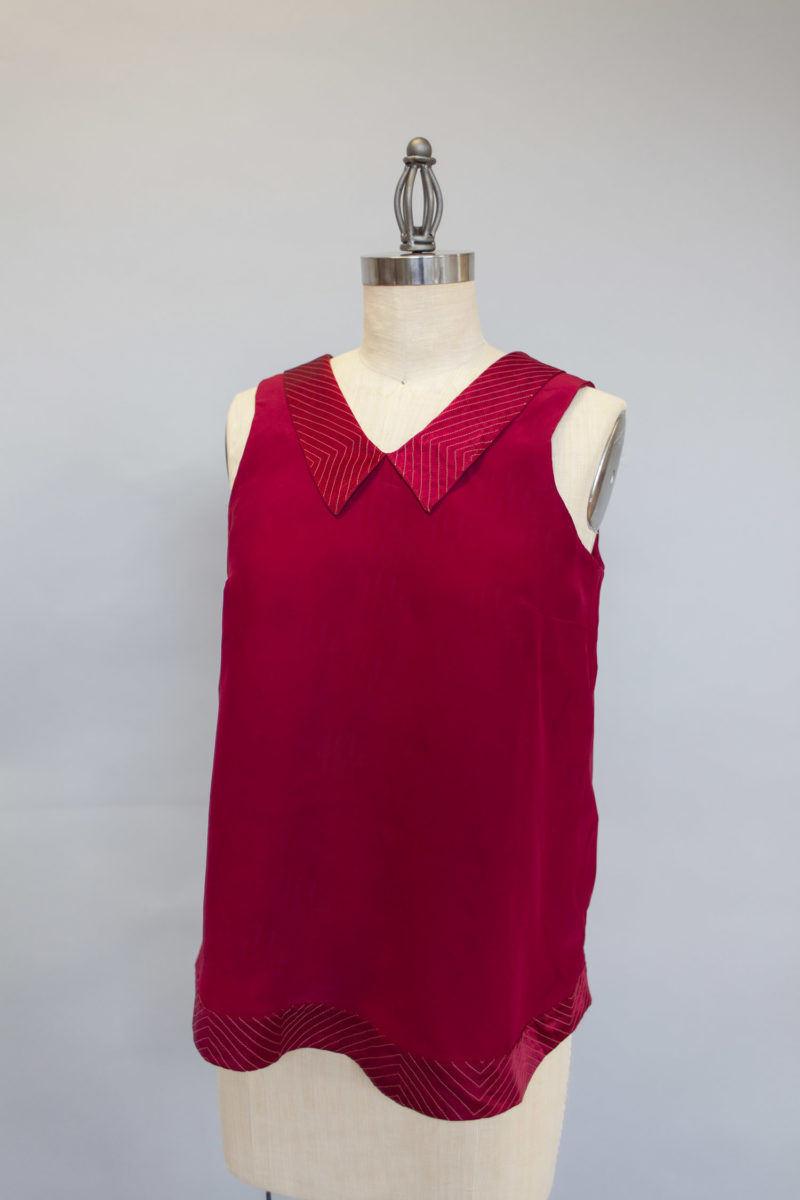
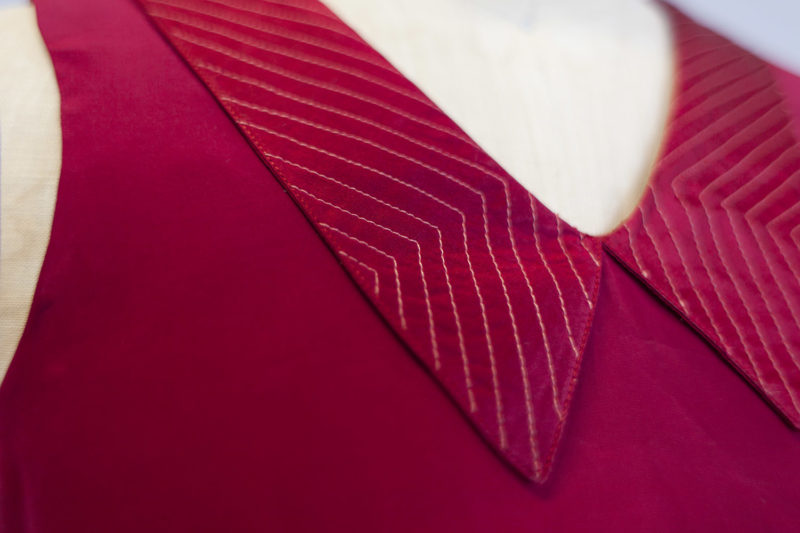
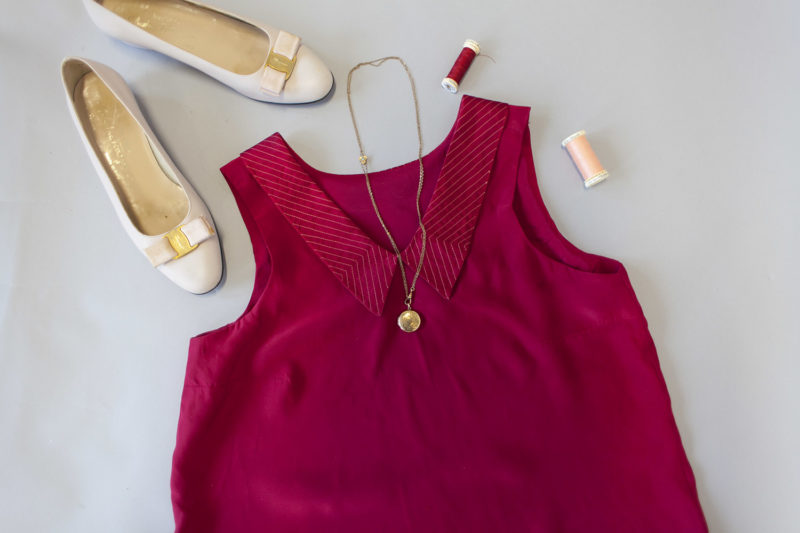
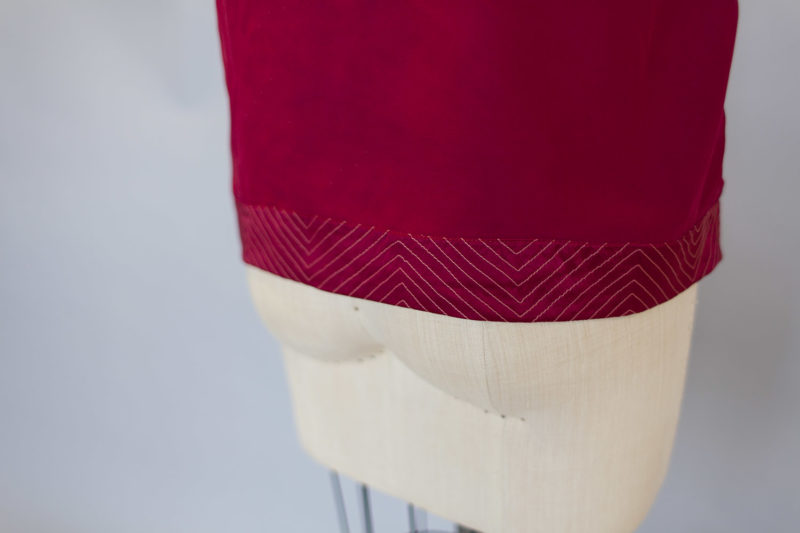
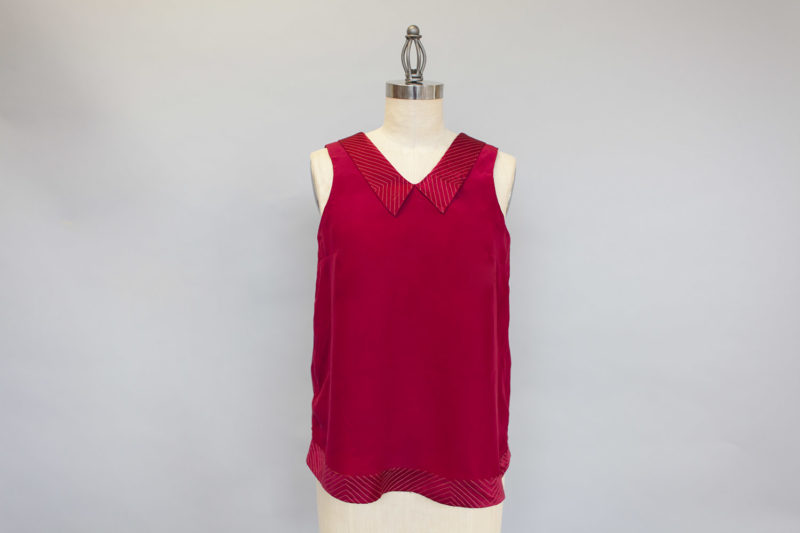
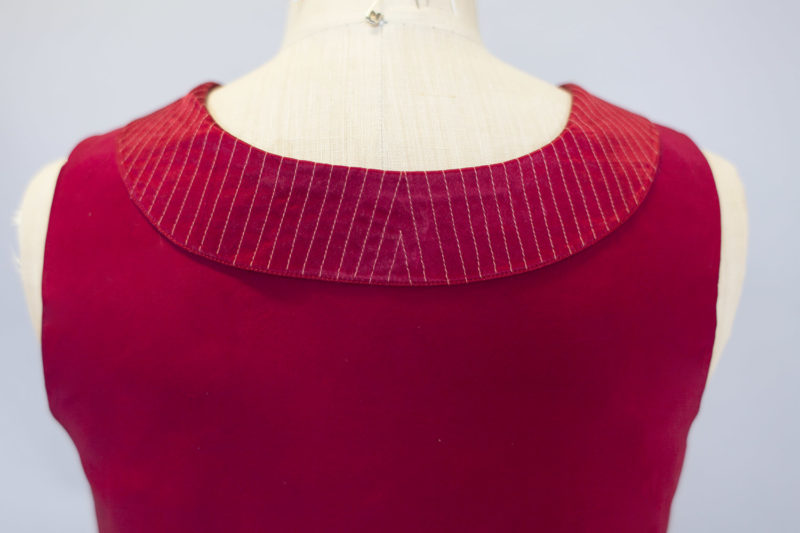
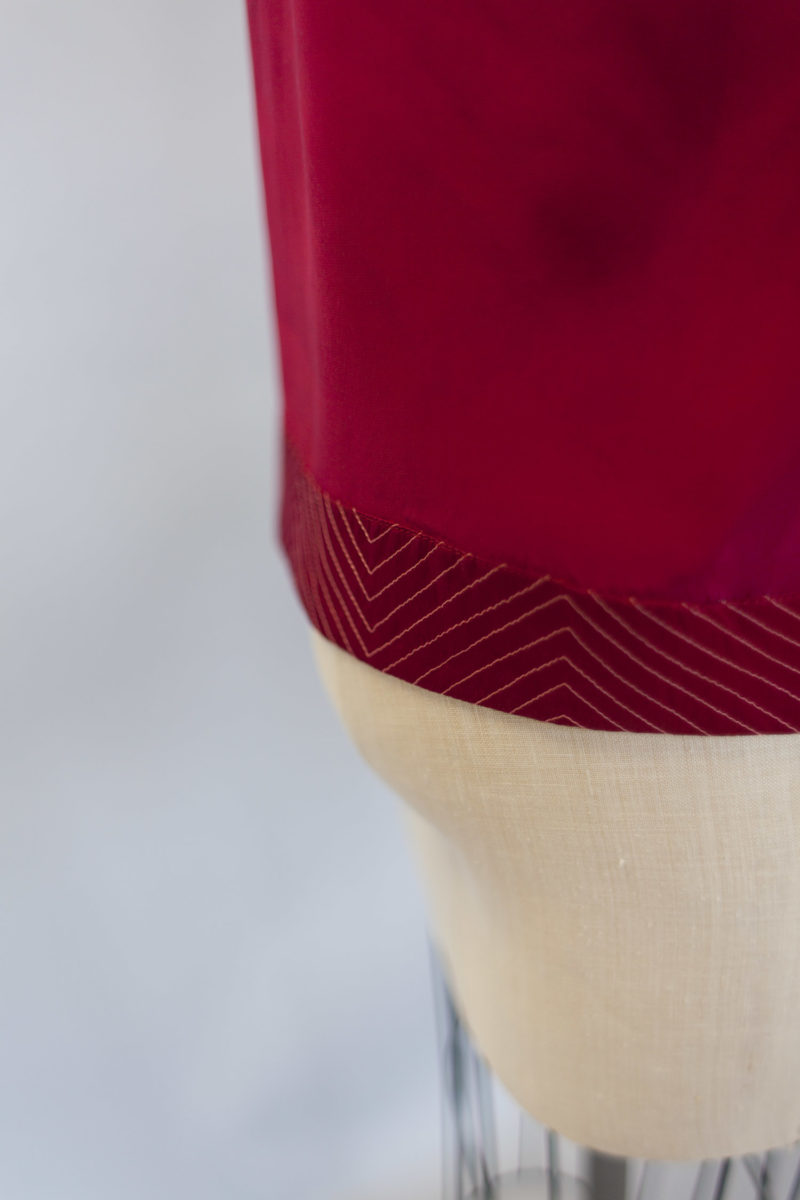
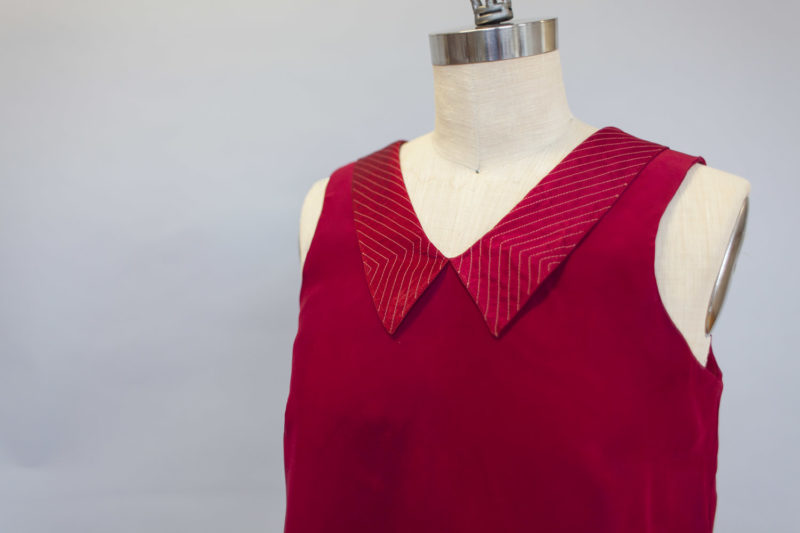
This week, we made a Seamwork Addison with some intricate topstitched contrast on the collar and hem. Using both sides of a silk charmeuse (matte side for the body and shiny side for the details) added even more texture to this rich silk blouse. The hem is finished with a topstitched exposed facing.
Read on to see more details on how it was constructed, and some helpful tips and tricks if you want to try something similar on a garment.
Materials
- The Seamwork Addison blouse pattern
- Silk charmeuse (see pattern info for exact yardage for your size)
- Lightweight fusible interfacing
- All-purpose polyester thread in a contrasting color for topstitching
- All-purpose polyester thread in a matching color for construction.
- Spray stabilizer, such as Sullivan’s (optional)
- Water soluble marking pen, pencil, or chalk
- Ruler
How to
- Follow the pattern instructions to cut out all the necessary pieces and apply fusible interfacing as directed.
- To create the exposed hem facing, trace the hemline of the blouse front and back. You can make this hem facing as deep as you’d like. For this blouse, the facing has a finished depth of 1 1/2 inches.
- Optionally, treat the pieces to be topstitched (the upper collar and the hem facing you just cut) with spray stabilizer. Make sure your fabric has been prewashed before you use a treatment like this. Spray stabilizer will help keep the fabric stiff and make topstitching lightweight fabrics like silk charmeuse much easier. Alternately, you can use wash-away or tear-away stabilizer, but spray is very easy and washes right out.
- Sew the back hem facing you cut to the front hem facing at the side seams, with right (shiny) sides together. Press seams open.
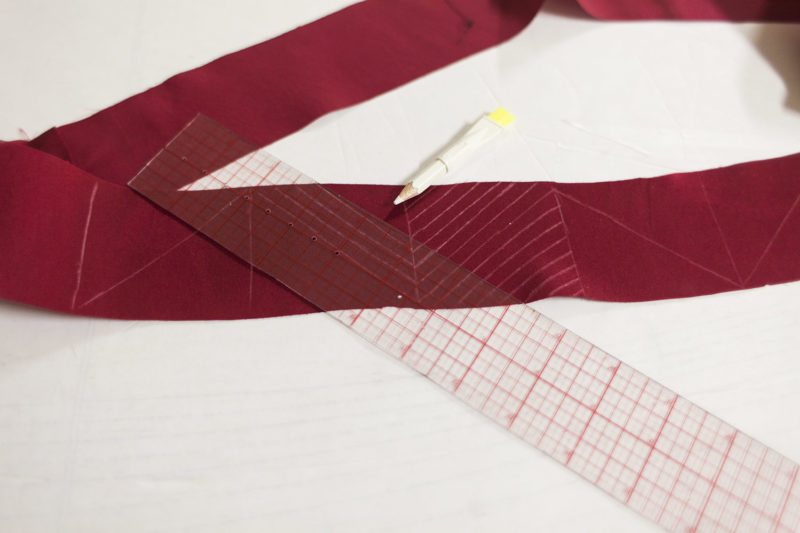
- Draw your pattern on the collar and hem facing using a water soluble marker and a ruler. You can use any design you like. For this Addison, the chevron lines were drawn 1/4 inch apart. These are drawn on the shiny side of the fabric, as this is the side that will face out on these details.
- Staystitch the edges of the collar and hem facing. It’s important to stabilize these pieces as much as possible to prevent stretching from all the topstitching.
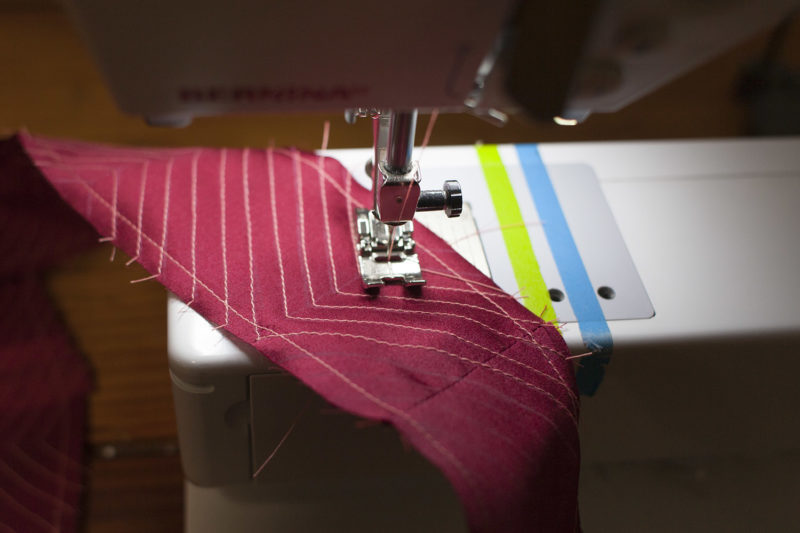
- Using a contrasting all-purpose polyester thread, carefully stitch along the marked lines to create rows of topstitching. Set your stitch length to 3-3.5 mm and stitch slowly to keep the stitching aligned. (A note on thread: if you are using medium or heavy-weight fabric, you can use a heavier topstitching thread in the needle, and all-purpose in the bobbin. For lightweight fabrics like this silk, topstitching thread and the heavier needle it requires will cause your machine to eat the fabric).
- Complete the remainder of the blouse as instructed in the pattern, until you reach the hem. For the body of the blouse, the matte side will be considered the right side; for the collar and hem facing, the shiny side is the right side.
- Turn and press the upper edge of the hem facing 5/8” toward the wrong (matte) side.
- Pin the hem facing to the hem of the blouse, with the right (shiny) side of the facing against the wrong (shiny) side of the blouse. Stitch along the hem.
- Turn the facing out to the right side and pin in place.
- Edgestitch the pressed edge of the hem facing to the blouse to complete the hem.

Constructing the blouse this way allows you to add topstitching to specific pieces before sewing them to the pieces that they face. All the thread tails of your topstitching will be neatly encapsulated in seams.
You can also choose to interface the hem facing with fusible interfacing, which will keep the pieces from warping. This will be particularly helpful if your topstitching pattern is along the bias, as this design is, which can cause the fabric to stretch diagonally.
However, this will also make the hemline much more structured. Stabilizers (either spray, or a removable stabilizer fabric) will help protect against this without adding body to the hem.
Tips and tricks
- Match the needle size to your fabric. Always start with a new, sharp needle for best results.
- Choosing the right thread for your fabric can take experimentation. You want it to be heavy enough to show definition, but not too heavy for your fabric. Practice on scraps with a few types of thread in the needle to help you decide. You can use all-purpose polyester thread, silk thread (which has a nice sheen), topstitching thread (for heavier fabrics), or embroidery thread.
- While testing thread, adjust your thread tension. Depending on your fabric and thread choice, you may need to tighten or loosen the upper tension. Once your stitches look neat, write down the tension so that you can readjust it when you get to the topstitching step in creating your garment.
- Topstitch with the right side up.
- Set the speed on your machine as low as it will go. Stitch slowly and carefully along the marked lines.
- Use matching thread for a subtle look and contrasting thread for a more obvious pattern.
- If you run out of thread in the middle of a line of stitching, don’t panic! Rethread with a new spool, and carefully sink the needle exactly into the hole made by the last stitch. Continue sewing. When you’ve finished the row of stitching, use a seam ripper to pull the thread tails to the wrong side and tie off.
More resources
- We have a previous post with tips and tricks for topstitching.
- Inspiration for your topstitching, with some great tips in the comments section as well.
Comments
Caroline J
February 9, 2017 #
Beautiful!
Dana Tougas
February 9, 2017 #
This is a beautiful and subtle detail!
Maria
February 10, 2017 #
Simple sweet technique
Thank u
PsychicSewerKathleen
February 10, 2017 #
This set my imagination on fire! I love this blouse for its simplicity but that idea about using the matt side for the body and the shiny side for the hem and collar is brilliant. I’ll never look at silk charmeuse the same again :) I love the idea of marking your stitch lines off first. I’ve only done this a few times but it makes such a difference especially for top stitching. Sometimes I get lazy but it never turns out anywhere near as neat as when I do take the time to chalk in my lines first.
Tirzah
February 10, 2017 #
Just gorgeous! Definitely inspired for a creative weekend. I’ve been needing more tops that are suitable for my office work. And I’ll take any excuse to buy silk charmeuse…Yippee!!
Regina
February 10, 2017 #
I absolutely love this idea and it has set my creative juices flowing. Thank you so much.
Ava
February 10, 2017 #
So do you just put regular matching color thread into the bobbin? No need to put topstitching thread there?
Sarai
February 15, 2017 #
Yes, you want to use all-purpose polyester thread in the bobbin, and topstitching thread (or the thread that gives you the right look you want) in the needle. Stitch with the top side of the garment up.
As for matching, the two thread colors should match each other. They might contrast with your fabric, or match your fabric. For this example, we used a coral pink thread against the deep red fabric.
Colleen
February 15, 2017 #
So pretty!
Aigli
February 15, 2017 #
It lools really beautiful! i have one question though..for the top stitching can we use silk thread? both in the bobbin and in the needle? have a silver-grey charmeuse fabric and matcing silk thread, i was going to sew a shirt but i saw your red Addison and i loved it!
Sarai
February 16, 2017 #
This should work as well. I’d just recommend testing it to make sure you like the look and to try out different levels of stabilization. For charmeuse, stabilization is key!
Chris
February 16, 2017 #
This is really sweet! And can I just mention that I only recently (last night) discovered the bonus additions to many Seamwork patterns that are available to subscribers?
Thanks! A lot of them are very lovely additions to the standard patterns.
Phyllis Chambliss
February 16, 2017 #
Very nice!
Elaine
February 17, 2017 #
Can someone help? I’ve got a small sewing machine and it stitches really well but the back is all bunched up. what I am I doing wrong? thank you.
Aigli
February 20, 2017 #
I think that your problem is the thread tension, the bobbin tension might be too tight