
 Sign In

Tutorial: Installing an Invisible Zipper (with video)
How to Sew an Invisible Zipper from Colette Patterns on Vimeo.
Zippers can be daunting even for experienced sewers. The reason? Zippers are often installed the wrong way.
Lots of seam ripping and swearing ensues, especially when it’s a simple mistake. There’s no need to be scared of zippers anymore!
We’re here to help. With a little bit of practice you’ll get it. Remember that it takes time to master something new and even then, it’s easy to make mistakes. Give yourself a break if you feel overwhelmed and come back to it later.
Invisible zippers are one of the nicest looking zippers because they are (as the name implies) invisible. We love to use this zipper in the garments we make for ourselves and recommend them often in our patterns. They look clean and professional, and (even better), they are perhaps the easiest to install!
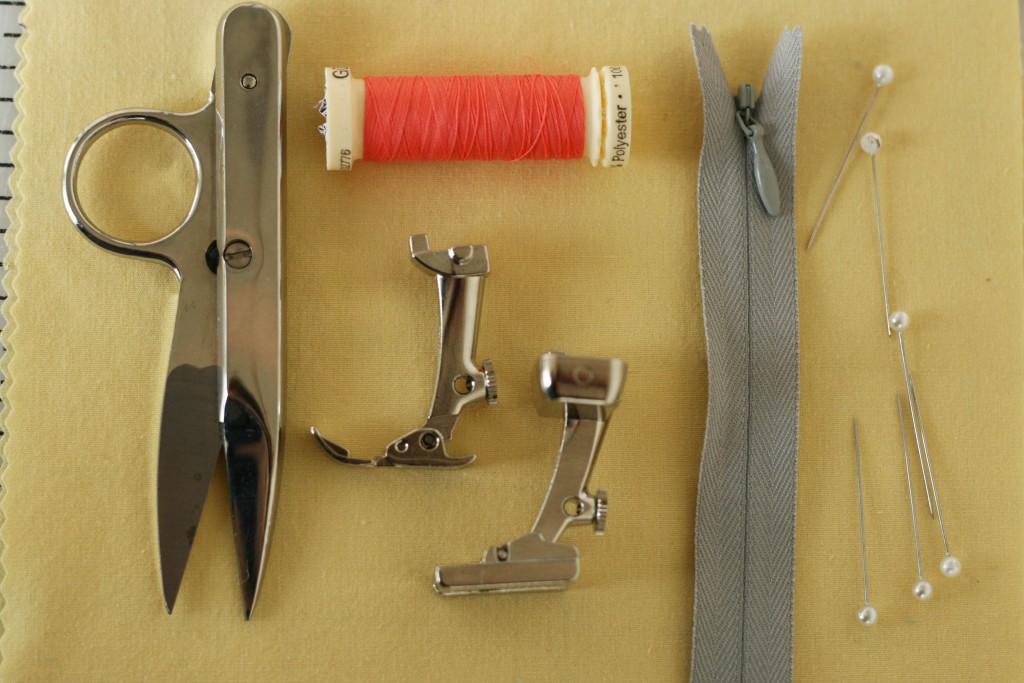
Items Needed:
- invisible zipper
- thread
- scissors
- pins
- invisible zipper foot
- zipper foot
- garment
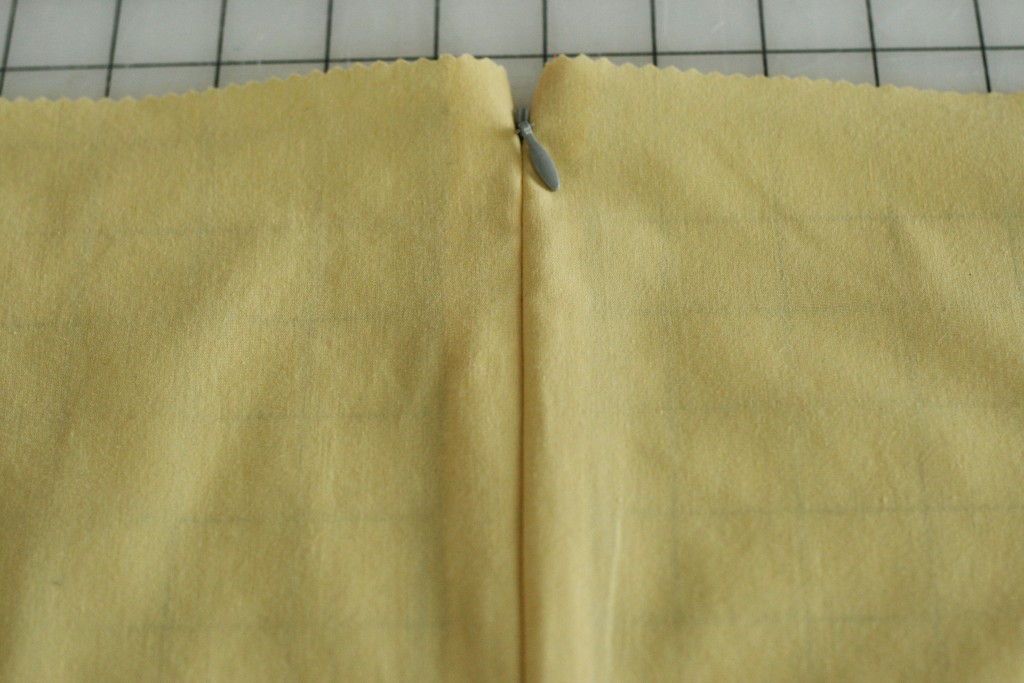
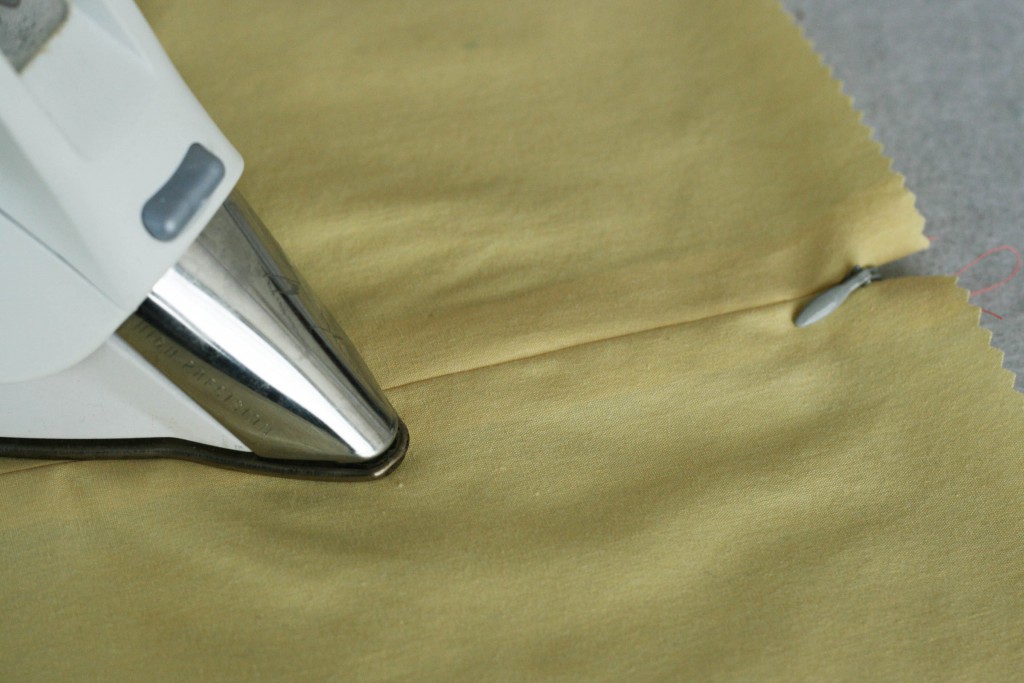
Before we start, take a look at the back of your invisible zipper. Do you notice how the coils of the zipper curl toward the back? This is what makes the zipper less visible than a normal zipper. But for sewing it in, it’s helpful to uncurl those coils and press the zipper flat first. This lets you stitch a bit closer to the coils.

1) Lay your zipper wrong side up, with the zipper open. Set your iron on warm (or the synthetic setting). Use your fingers to uncurl the teeth of the zipper while pressing it flat with the tip of your iron. Do this on both sides.
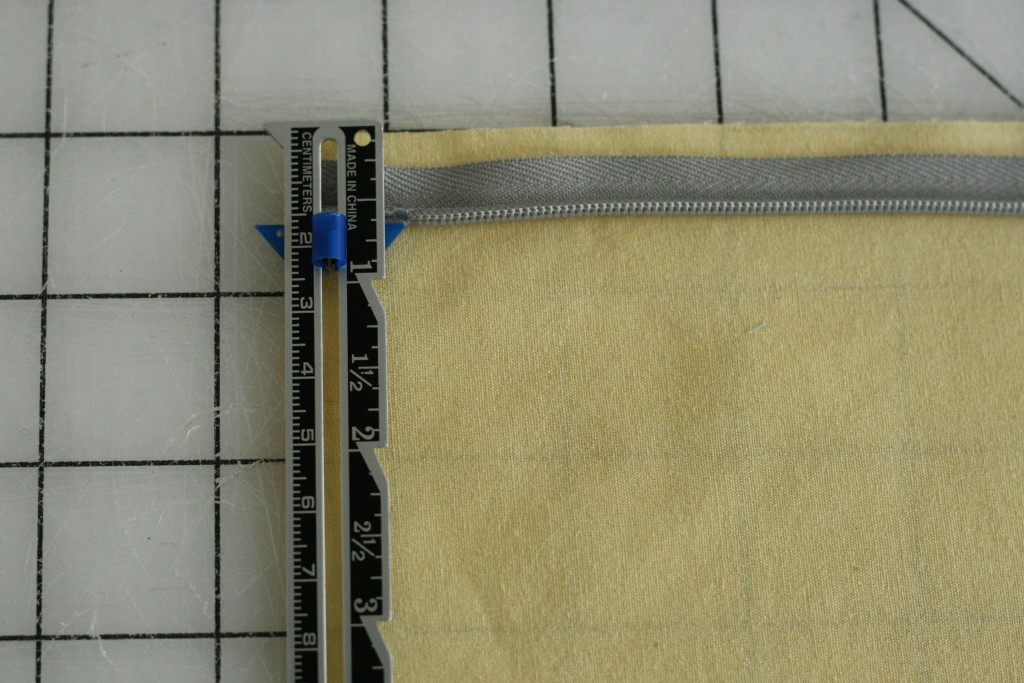
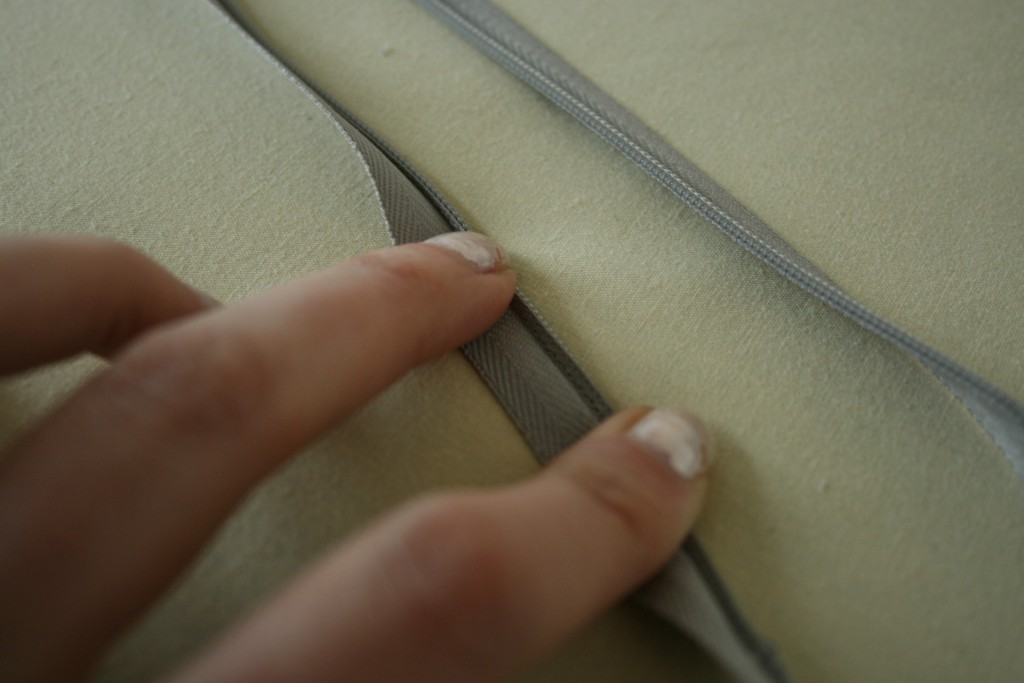
2) Put your garment right side up, facing you. Place the zipper face down on the fabric. Here we left about 1/4″ between the zipper tape and the edge of the fabric because the zipper tape was thin. Use a seam guide or measuring tape to make sure the zipper coil lines up with the seam allowance. In this instance a 5/8″ seam allowance was used.
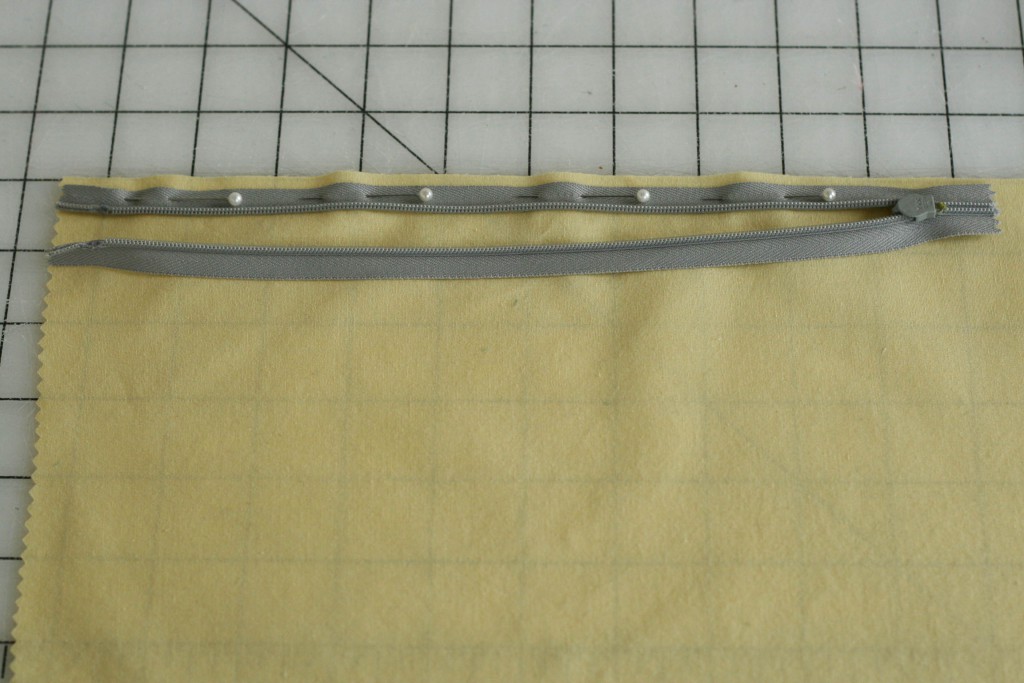
3) Pin the zipper to the garment. Notice that the zipper is face down in this photo as it should be every time you sew an invisible zipper.
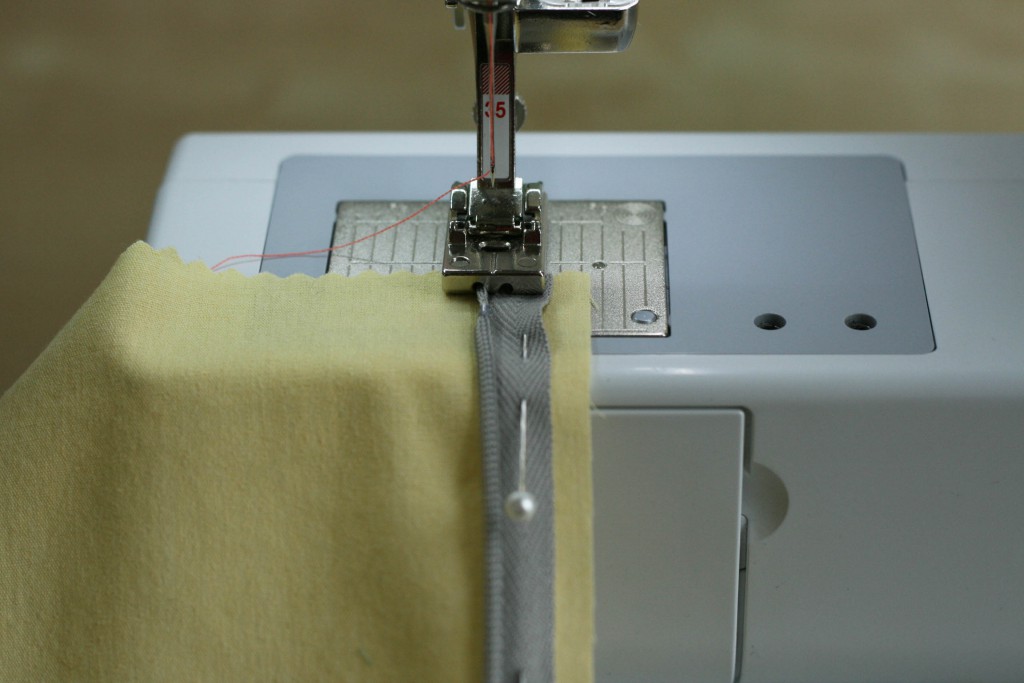
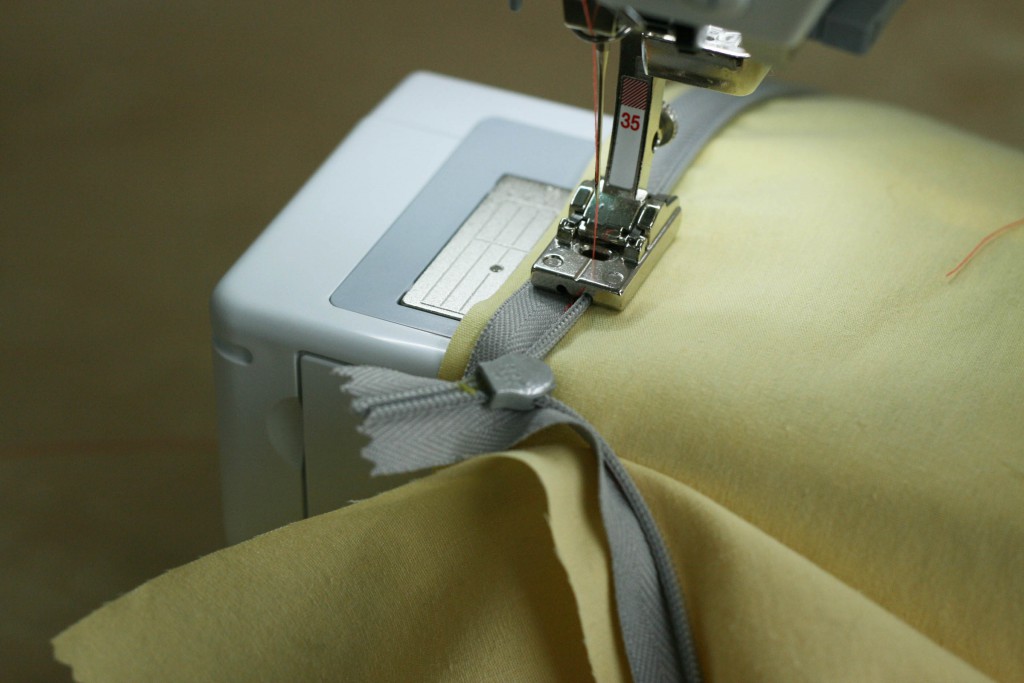
4) Having inserted the invisible zipper foot into your machine, lower the foot down onto the zipper. Make sure that the zipper coil is in the left groove of the foot.

5) Stitch the pinned zipper. Sew slowly, removing the pins before they reach the foot. Stop when you reach the end of the zipper, or the mark on your garment where the zipper should end. Backstitch about 1/2 inch.
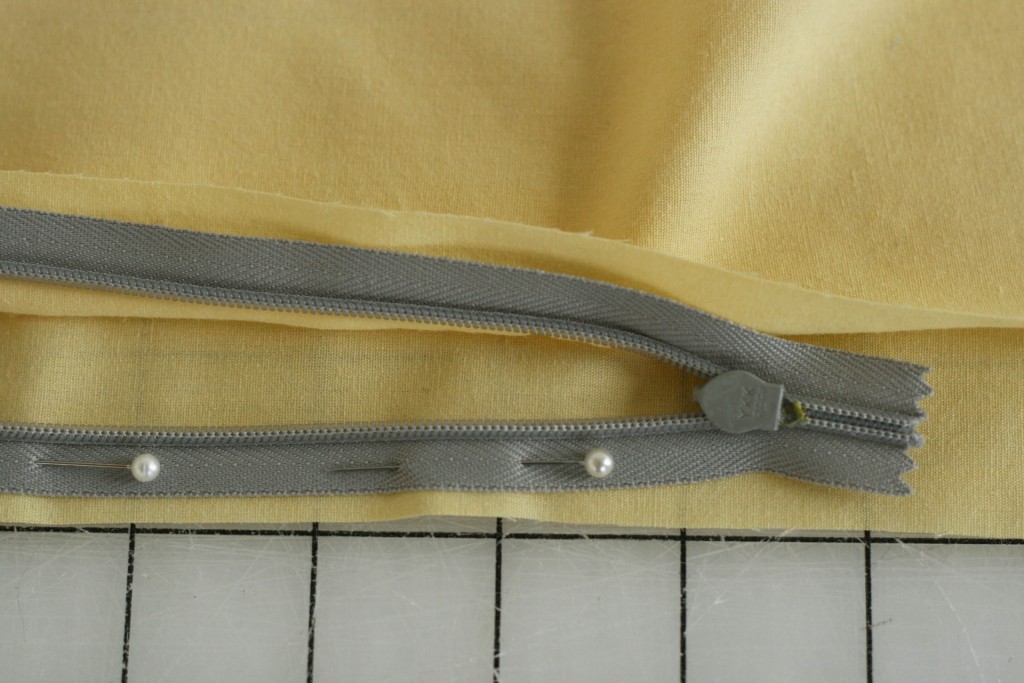
6) For the opposite side, pin the zipper to the garment so that it resembles the above photo. Again, make sure that the right side of the fabric is facing up. So you are pinning the zipper to the right side of the fabric.
7) Close the zipper to make sure that you’ve pinned it correctly. This part can easily get twisted, so it’s best to double check before you do any sewing. Once you’ve checked, unzip it before sewing.
8) Sew the zipper as you did the other side. However, this time make sure that the zipper coil is in the right side groove of the foot.
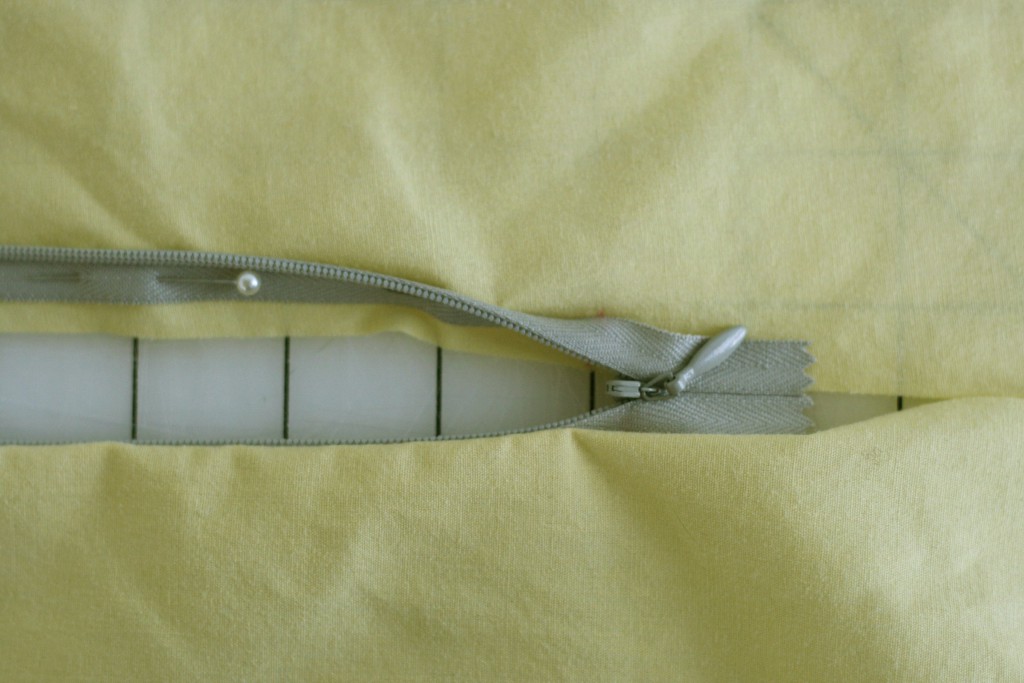
9) The zipper is now firmly in your garment, you did it! Just a few more steps to go. Pull the zipper closed and lightly press before continuing.
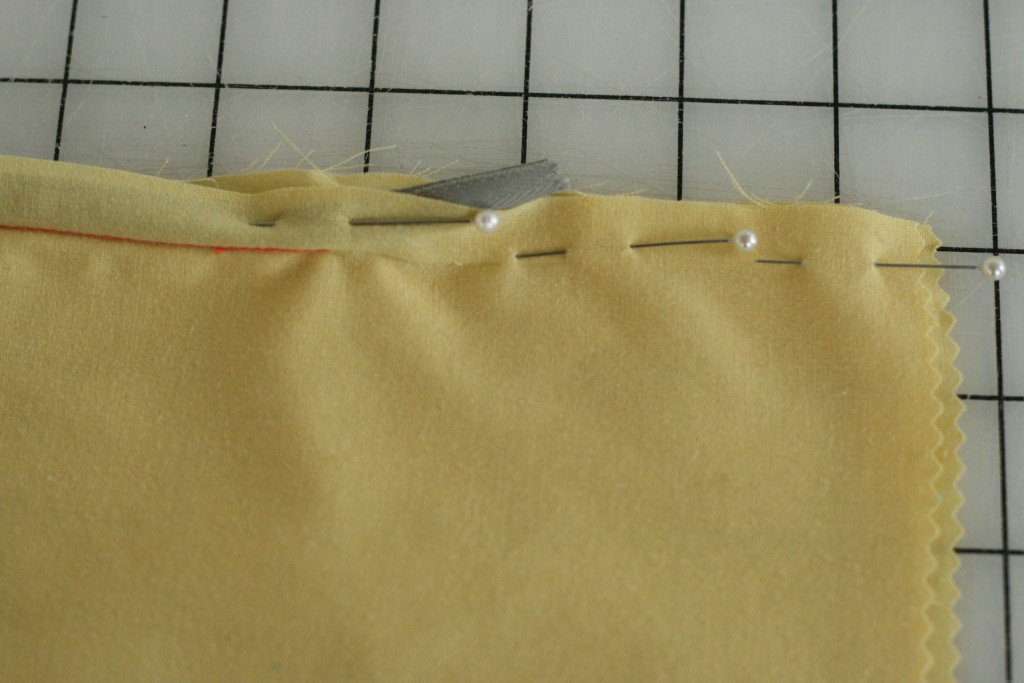
10) Sandwich the zipper in the seam allowance and pin carefully down the rest of the seam. The zipper tail should be out of the way, otherwise it’ll get caught in the stitches you’re about to make.
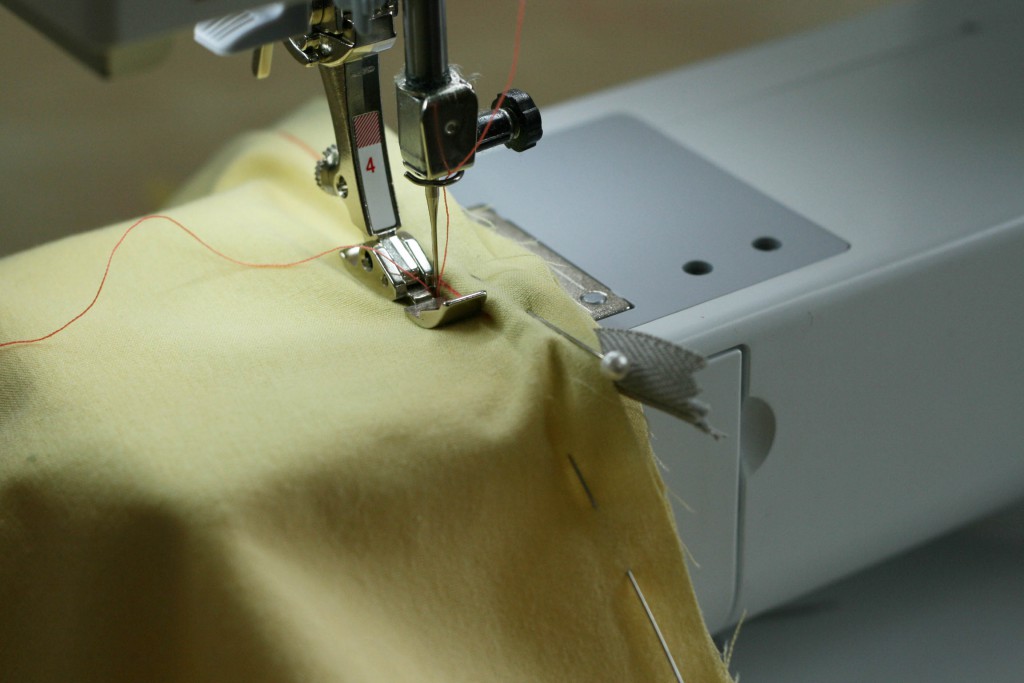
11) Remove the invisible zipper foot and replace with a standard zipper foot. Put the foot to the left of the zipper. Starting about 1/4″ or so above the end of the zipper, slowly stitch forward then do a small back stitch. The zipper adds bulk right here and will try to pull away from the needle. Instead of forcing the needle to be right next to the zipper, just stitch slowly as close to the zipper as you can. Sew down the remainder of your garment.
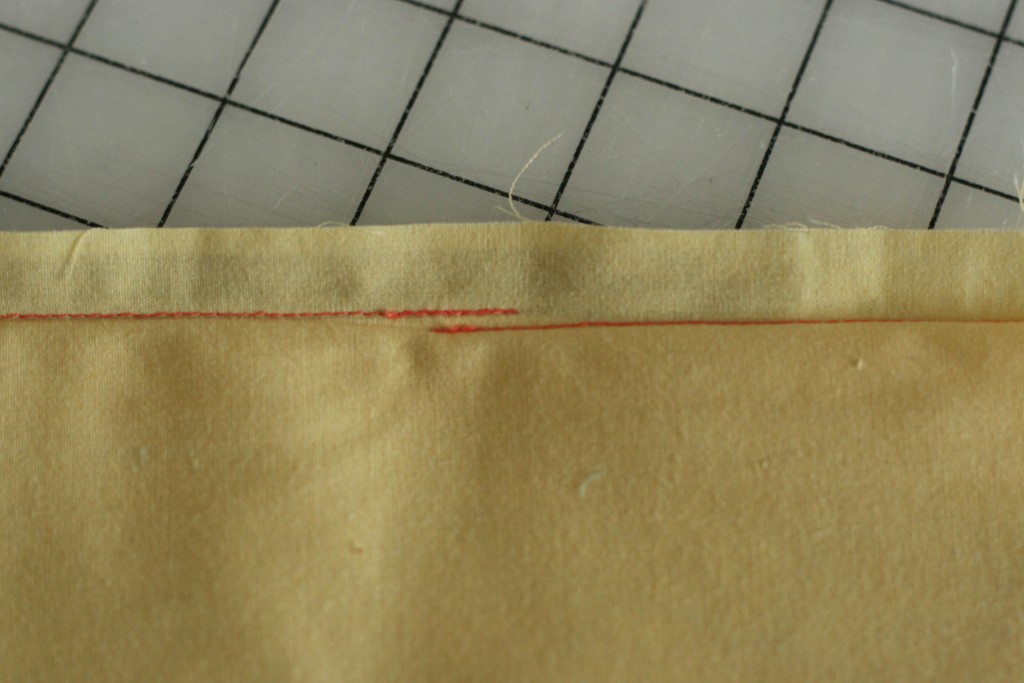
12) You can see that the stitching lines have about 1/8″ of space between them. It’s okay that they don’t match up! If you are able to match them up perfectly, then do so. Even with that small bit of space your zipper will still look good.
And there you have it! A lovely finished invisible zipper.

Comments
Marie Roche
April 12, 2011 #
Is it correct that an invisible zipper foot cannot be used on all fabrics? I heard a sewing instructor say this, that invisible zippers should only be used if the fabric has a bit of loft. Is this true?
Thank you for this tutorial it was clear and very helpful.
Marie Roche
Antoinette
July 23, 2013 #
Felt confident with the instructions and when I attempted to sew the invisible zip, I managed to do it finally. Thank you
Brittan
April 12, 2011 #
Its true, Invisible zippers are HARD, I think step 11 can be the toughest .
I was shocked when I finally started to get zippers right right! haha.
Another great tutorial, I love the little tips pointed to by arrows. Good job! xo
Caroline
April 12, 2011 #
This tutorial assumes its readers have an “invisible zipper foot.” So many of us are sewing on ancient machines. It’s possible to make do. Even new machines sometimes don’t have zipper feet. Husqvarna Viking owners will be using their buttonhole (C) foot. No joke. The Juki F-series doesn’t come with an invisible zipper foot so I have made do other feet (instead of special-ordering a foot), sometimes with even better results. As long as the foot isn’t sliding over the coils and one is able to sew in a straight line, finding a target line on the zipper (usually a margin with a visibly different weave closest to the coil) and sewing along it works well.
Sarai
April 12, 2011 #
We should point out that most fabric stores carry very cheap (I think I’ve bought one for $3) plastic snap on invisible zipper feet. Of course, they don’t fit on all machines, but if you have one that it will work with, it’s a really cheap option.
Caroline
April 12, 2011 #
Hmmmm. That might be an option for me for the Juki! Thanks Serai.
Reana Louise
April 12, 2011 #
I’ve purchased a generic cheap plastic foot for invisible zippers and whilst it was a bit of an effort getting it on, it still worked perfectly fine once it was (finally!) on there.
Since then my boyfriend spoilt me with the proper metal foot (probably sick of my whinging! ha!) and working with it is a total breeze- but the plastic ones still work fine if it’s your only option.
Sarai
April 13, 2011 #
This is basically my experience. The real metal feet are indeed nicer, but I’ve sewn zippers with cheap feet in the past and it worked fine. I don’t see much harm in experimenting with it if the more expensive feet are inaccessible.
Gordana Radovanovic
April 13, 2011 #
Hi Caroline,I’ve just discovered your blog seeing the zipper tut.Unexpectably for me,you had a great advice for the Husky mashine which I own,thanks a lot!Also,I think your tip is great,since the invisible zippers are lovely looking but a real nightmare for sewing…greetings from Serbia
Caroline
April 13, 2011 #
Hi Gordana,
Happy that you found what you needed. Here is a more specific tutorial for the Husqvarna Viking machines which lack a dedicated zipper foot:
http://www.geocities.com/fashionavenue/3824/invszipper.html
Adi
February 23, 2013 #
Thanks for mentioning that Husqvarna users can use the button foot! I would never have thought of that.
Katrina
April 12, 2011 #
I’ve done invisibible zippers so many times, and I STILL can’t get it to look good! Thanks for the tutorial–time to practice, I think.
sewer
April 12, 2011 #
Caroline:
It is possible to install an invisible zipper without the special foot, but it is harder. I’ve sewn on an industrial Juki; it’s a very common, cheap, and easily available foot. I had to buy one for my home sewing machine, again, it was easy to find and was inexpensive.
The traditional method of installing an invisible zipper has been illustrated, in which the zipper is installed before the seam is sewn. I once took a class in which we installed the zipper into a closed seam, but that involved basting part of the seam first. It was truly fool-proof and avoided the bubble at the bottom of the zipper. I don’t recall all the steps, otherwise I would post the method.
Caroline
April 12, 2011 #
Thanks – I know it’s possible and I mentioned how. I’m not sure you read my comment. The invisible zipper foot for my machine is not available at any stores in Portland. There is only one official Juki dealer and according to him it needs to be special-ordered. Which is why I was thankful for Serai’s comment. $3 is a nice price.
Christina Draper
October 1, 2011 #
I absolutely love this method. It truly is foolproof. Just be sure to measure and mark where the closed end of the zipper hits in the seam and backstitch over that spot. Once the zipper is on, you can then take a seam ripper to let it out, not going past your backstitched spot.
Cindy
July 13, 2012 #
I learned how to install an invisible zip from my mom and she always used the basted seam method, however, I’m going to try this one too just to see the difference. I don’t have an invisible zipper foot either but I’m going to look at my local fabric shop and see if I can get one. With the basted seam method you baste the seam and press it open. On the wrong side of the garment you centre the zipper teeth (zipper closed) over the seamline and pin it in place. Stitch the zipper onto each seam allowance and when it’s securely in place, remove the basting stitches. I’m sure there are many more “tips” and specifics than I’ve got here, but that’s the general jist of it as I recall.
Heather
April 12, 2011 #
Thank you for the great tutorial! There were a couple tricks in here that I’d never done before. I think I have a couple invisible zippers around – time to practice! :)
Steph
April 12, 2011 #
If you have the right foot for the job, you should never NEVER need to press open a zipper tape. They aren’t designed to be pressed, in fact they are specifically designed to roll. Don’t do your zips this way, you’re setting yourself up for failure.
Caroline
April 12, 2011 #
Is it possible to disagree and agree at the same time? I press them when I don’t have the correct foot so I can see what I’m doing. I don’t see a difference in the end result. I get a nice flat-lying super-hidden zipper. Please elaborate.
And thanks for the tip on the plastic foot. I assume you’ve tried them?
Sarai
April 12, 2011 #
Steph, I respectfully disagree with your experience. I always press my coils, even with my fancy Bernina foot, and get better results that way.
Yes, they are designed to roll, and will continue to do so once you zip them up again. I believe even the Coats and Clark Sewing book (manufacturers of invisible zippers) says to press them lightly (see this reference on Sewing.org). I also have some manufacturer instructions right here that say to press lightly “for easier application.”
Anyway, I know some people prefer not to press them and I respect that, but your comment seems a bit extreme. I’ve yet to have a “failure” because of pressing per manufacturer’s instructions.
Caroline
April 12, 2011 #
I also thought the word NEVER was extreme, since everything I’ve read says to press them. Though if you have a good zipper foot (and some I’ve used have crummy grooves) it kind of takes the need to press the zipper out of the equation, which is sometimes nice.
Steph
April 12, 2011 #
Also, make sure it’s the metal foot designed for your machine. The plastic snap on feet are basically worthless.
Leah
April 12, 2011 #
Is there a way to do this by hand? I know it’s weird but I prefer doing zippers by hand, I feel like I have more control.
Susan – Knitters Delight
April 13, 2011 #
I really appreciate this tutorial. I have a Bernina including the correct feet, but still have had a hit or miss result on my construction. Low and behold, I realize now that I have been sewing the zipper right side up with the fabric wrong side up. I am happy to now do the reverse.
One question that another commenter also asked – isn’t the bottom portion of the seam suppose to be sewed first to avoid bubbles below the zipper? I vaguely remember hearing that somewhere.
Sarai
April 13, 2011 #
Hi Susan… is it possible you are thinking of a standard (non-invisible) zipper? If you were doing a standard centered zipper, you would sew the seam at the bottom first. With invisibles, you leave it open. If you look at the photos for steps 6 and 7 above, you can probably see that it would be much harder to sew the zipper at the bottom in if the seam was stitched.
Lola
April 13, 2011 #
Great tutorial! However, I would like to make a wish for a following one – how to finish an invisible zipper with the facing or lining… I just never get really clean results there!
Caitlin
April 13, 2011 #
Patricia’s comment is great! I also found a tutorial and posted about it in the invisible zipper thread in our forum.
Patricia Austin
April 13, 2011 #
Veronica Shaeffer from http://www.vsgowns.com/ just gave me this extremely helpful tip when dealing with lining AND invisible zippers. I had just posted this very question only moments ago. Kismet! Thanks Veronica!
“Btw, you can machine stitch the lining to an invisible zipper by turning the dress inside out and then laying the lining over it. Match the lining edge to the zipper/fabric edge and then stitch with your invisible presser foot. The zipper will be between the self fabric and lining, if that makes sense. Actually very easy once you give it a try!”
Steph
April 13, 2011 #
I appreciate the respectful disagreement, which is why I never say much when I see similar tutorials. I assume I’d be tarred and feathered for disagreeing. Please know that I teach sewing, I have taught hundreds of women (not many men come to classes) to sew invisible zippers, and I can boast a 100% success rate. I take great personal pride in the success of my students.
I see a big problem with plastic feet. They don’t function as they ought to. I have never seen one perform the function they should. Metal invisible zipper feet usually range in the $18-42 price range here in Australia depending on the model, and the plastic foot retails for $3. The metal foot may need to be specially ordered even though the shop where I works carries plastic feet. If someone wants to try the plastic foot first for whatever reason, I warn them and then do my very best to teach them to put in a good invisible zip.
I define “good” as they shouldn’t have to break their brains and offer their firstborn to the sewing gods in order to get a good result. Good results with plastic feet in my experience=nil. Never. I can stand by that. Further, I find if I let someone buy a plastic foot and try to put in a zip that several things may happen:
–Melting the zipper as they press it. Unless I press it myself, there’s a high likelihood of someone over-pressing and the zipper teeth stick together. In such a case, I humbly suggest it may be a faulty zipper and give them a new one.
–Bad zipper. A plastic foot simply does not (as far as I’ve seen it) roll the zipper coil effectively, and generally leads to sewing too far from the zipper coils or the sewist mistakenly sews over the coils. Either way is not a good invisible zip.
I’m not saying that with a great deal of patience and perserverance a beginner or intermediate sewist can achieve a good invisible zip. I just say that these kinds of tutorials actually make my blood boil because I know it doesn’t have to be that difficult or mysterious. A good invisible zipper foot engineered specifically for the machine and the task will present perfect results every time.
Sometimes I offer the alternative of the right metal foot to someone who insisted on using a plastic foot. Some people need to make mistakes before they will listen. That’s fine. I’ll get the right metal foot, let them try it, and they immediately buy it, even at $42. With the right technique and the right foot, an invisible zipper takes about the same amount of thought as fusing interfacing properly. I don’t think we as sewists should celebrate making life harder on beginners and intermediates. I know that’s not what you’re saying here and I appreciate that you regularly post new and interesting tips and techniques, but this tutorial leaves me cold.
Caitlin
April 13, 2011 #
Hi Steph,
Thank you very much for offering your view on the tutorial. I can understand your frustration with seeing advice contrary to your own, especially when you feel that it is impeding learners. While you disagree with the pressing of the zipper and the plastic foot, I wasn’t sure what upset you about the tutorial. I have created a post in the forum about invisible zippers and welcome your input.
While we try hard to help all sewers learn the best ways to do things, we do make mistakes. In this case, I think that it is a difference of opinion. Sarai and I both see sewing as something that suits each person differently. In this case, you have had no positive experience with ironing zippers or plastic feet. However, Sarai and as others have had success. I think that this is a good example of how two methods work differently for others.
I would like to stress that beginners will make mistakes and we would love to help them avoid them! If we felt that our advice was a hinderance, we wouldn’t offer it. As with all tutorials and methods, each sewist should test it out to see what works best for themselves.
Thanks again for your input and please feel free to continue the discussion in the forum.
-Caitlin
Kelli
April 9, 2013 #
Steph
I read your comment with great interest. I am currently trying a new technique that I have heard about – to insert invisible zippers ‘in reverse’. I have explored the web for directions to no avail.
I see you are a sewing teacher so you maybe can help me.
Steph
April 13, 2011 #
I’ll add, respectfully, I have never seen instructions to iron the coils included on a zipper, but I know I haven’t seen every brand of zipper out there.
Amanda
April 14, 2011 #
Thank you! I love this tutorial. It’s really easy to follow.
I have inserted an invisible zip in the past with some success (and a few mistakes!) but now I see where I have gone wrong.
So well timed too – I’m nearly ready to put the zip into my parfait dress.
Faye Lewis
April 17, 2011 #
THANK YOU, THANK YOU, THANK YOU. My problem was knowing just how far to place the zipper tape away from the edge of the fabric. This clear tells and shows me. Thank you again!
Layla
April 18, 2011 #
While a good specialized foot may save time, and help you achieve great results without the learning curve, I’d like to mention that I have used my regular zipper foot to install invisible zips using the same instructions illustrated so clearly in this well-photographed tutorial. I’ve never melted a zipper, and ironing (mentioned on sewing.org which my zipper manufacturer coats and clark references on their invisible zip blog post) is a crucial step for me, using the regular zipper foot.
I appreciate Steph’s frustration and the fact that her long experience with her method is highly successful. But I also agree that this is a case where this common method works for many people, is not technically inferior (as long as you watch the temp of your iron, probably the best take home point of this particular sidebar), and for people like me means you don’t spend the money on another foot and can instead buy more zippers and fabric ;)
I continue to appreciate these clear tips from Colette Patterms – and I also enjoy the discussions they inspire.
Heather
April 24, 2011 #
So, what if someone was just now at the point of inserting an invisible zipper, and, never having done one before and having seen nothing in the pattern or pattern instructions indicating that a 5/8 seam allowance was required, is now left with a 1/4 seam allowance to work with? Is there anything wrong with using a smaller seam allowance?
Thanks for the great, and very timely, tutorial.
Christine
May 16, 2011 #
You’ve probably already figured out by now that you *can* use a smaller seam allowance, though it can make lining up the edges of the zipper tape and fabric more difficult (since you can’t see through the zipper tape to the fabric below). If it’s all you have to work with, then that’s what you’ve got to use. I would suggest finishing the seam allowance with a triple zigzag stitch to minimize any fraying which might cause the zipper application to fail further down the road, and marking the seamline so you have a guide to line up the zipper coil against.
My preferred method for any type of zipper application, though, is to cut my seam allowances to match my zipper tape width (measured from outer edge to center of the coil). For example, if I am doing a centered or invisible zipper application, I cut my fabric out so there is a 1/2″ SA the length of the zipper insertion (because my zipper tape width is slightly less than 1/2″, and the rest is taken up with the turn of cloth). If I am using a commercial pattern, this usually means trimming 1/8″ away from the SA. I find that it’s so much easier to sew edges that match each other (an added bonus – I don’t need to use pins!).
I learned this from the Fashion-Incubator.com website (which Caitlin referenced above). The methods described on that website are the *only* ones I use to apply zippers anymore.
Kelli
June 28, 2011 #
Just wanted to say thanks for the great tutorial. I haven’t put in an invisible zipper since I was about 10 learning how to sew in 4-H and that was with help from my sewing leader, so I really couldn’t remember how to do it. I followed your tutorial exactly except that I don’t have an invisible zipper foot. I’ve got a Viking and didn’t think to use my buttonhole foot, I used my blind hem foot. It’s got the perfect ridge for the coil to sit in. I am bookmarking this for future reference. Y’all are great, keep it up!
Lizzy
July 5, 2011 #
I’m doing a decent job with the invisible zippers now but cannot for the life of me make a clean finish at the top with a hook and eye. Any tips for that?
Christina Draper
October 1, 2011 #
You need to make sure the hook and eye are set with the top of the hook and the top of the eye even to the edge (fold) of your fabric. The edges of your fabric will meet and there should not be a gap between them. If this isn’t your problem, then your zipper may not be stitched on properly. A lot of people make the mistake of leaving the zipper zipped up when they stitch it on. You should have the zipper unzipped when you are stitching the top part on. If it is left zipped up, the zip part of the zipper will get in the way of your sewing and create a little wave in your stitch line. Sometimes this will force the two top ends of the zipper out, rather than in.
Amber
July 5, 2011 #
Thank you so much! I’ve never actually seen this so easily done!
Claudia
July 6, 2011 #
Thank you for another great tutorial! I recommend this blog to all of my sewing students and look forward to each new post. I guess I am with the few who do not use the plastic zipper foot. I roll the teeth of the zipper as ‘open’ as possible, press and use my sewing machine’s regular zipper foot. I always have great results and have never damaged a zipper with the iron.
Duckie
July 17, 2011 #
Huzzah! Just used this tutorial to put the (non-invisible) zipper into my nearly-finished Ginger skirt and after 5 years of sewing, it’s the neatest gosh-darned zipper I’ve ever inserted. Glorious.
Lisa
August 16, 2011 #
Thank you, THANK YOU! In my 15 plus years of sewing, I’ve lost track of the number of times I’ve been aggravated from installing invisible zippers, and I’ve never been happy with the results….until I read your instructions! There are so many helpful tips that I had just never come across in any other instructions before. I just finished installing the zipper on my Ginger skirt, and I am pleased and satisfied beyond words! You are never too old to learn a better way of doing something!
Lyne
August 18, 2011 #
Yay ! my first ever invisible zip ! thanks now feel confident to finish my parfait
Gayle
September 9, 2011 #
This is a great tutorial. It’s wonderful that all of these things are available online, and I must say that the Coletterie, as it’s now named, is the first spot I check for tutorials, as the pictures and writing are crystal clear.
I teach private and semi-private sewing classes, and was looking for an invisible zipper tute to send to a friend in another country, as I’m lazy and knew I could find it online rather than have to take pictures myself! I bring up the classes, as I teach basic zipper installation in the first two hour class. Once you can sew a straight line, you can install a zipper, so far as I’m concerned, and I think that so many of (myself included!) scare ourselves with the perceived difficulty of sewing tasks, psyching ourselves out. I spent years of my sewing doing anything and everything to avoid installing zippers, and could have kicked myself once I finally “manned up” and did it, as it was so easy, not the monster I’d considered it to be.
Which I guess is a long and round about way of thanking you for demystifying sewing for so many people.
PDX Gretchen
September 23, 2011 #
Thanks to your wonderful tutorial, I’ve just installed the nicest invisible zipper I’ve ever done. On a Ginger, to boot. Thank you for such clear instruction, in your tutorials and your patterns.
Christina Draper
October 1, 2011 #
I’ve always just used regular zipper feet to install invisible zippers. Really, the most important part of it all is pinning everything EXACTLY. Then get as close as possible to the teeth of the zipper.
Faye Lewis
October 9, 2011 #
Thank you very much for this tutorial. My application is still not as easy as eating cake, but I’ll keep practicing and maybe one day it will be.
Marie
October 16, 2011 #
Just wanted to say that I used to hate and mess up zips every time I attempted them, until I found this brilliant tutorial…many thanks!
donna
October 30, 2011 #
thank you for this great tutorial. i made a soft wool ginger skirt and the zipper looks professional! i have never had a zipper to come out so perfectly. i don’t have an invisible foot so I used my clear plastic foot that i use when making small tucks/cording. it worked fine.
Faye Lewis
November 27, 2011 #
I really need to thank you each and every time I insert an invisible zipper. Just did another one – THANKS!
Mary
December 8, 2011 #
Have yet to try your advice, which is more thorough than what I had been given elsewhere. However, nowhere do you (or my other source) state whether one is starting to install the zipper on the left or right half of the garment. Considering you start with the zipper upside down and then flip it over, there is an inherent possibility of confusion, and some of us manage to sew despite of a severe lack of spatial relations
Jo
January 23, 2012 #
I have just made a skirt tonight and followed this tutorial to install the zip. It worked! The only thing was that I could have got closer to the teeth so the zip was more hidden, but I am absolutely stoked with my first go!!
Pat
March 29, 2012 #
OMG, you have the BEST tutorial for invisible zippers!!! Thanks!!!
Kate Setzer Kamphausen
April 10, 2012 #
This tutorial is great! Just a further bit of information: I buy and give away multiple copies of THE READER’S DIGEST COMPLETE GUIDE TO SEWING. Any edition. Check Ebay. Seriously, it tells you almost everything from “this is a needle” (with useful information about the sizes of needle eyes!) to “here’s how to make a welt pocket” and everything in between, INCLUDING how to install all kinds of zippers. Fantastic stuff.
Lysandra
April 17, 2012 #
Thank you. Thank you. Thank you. For this amazing invisible zipper tutorial. I have never sewn a zipper, let alone an invisible one, but I used your tutorial and installed a beautiful invisible zipper in my chiffon maxi skirt. It’s not perfect, but pretty darn good for my first go! Your tutorial was a life saver!
Marge Freeman
April 21, 2012 #
I have sewn many invisible zippers into pillows without cord, I have a request to sew them into pillows with cord, is that possible?
Janett
April 28, 2012 #
I’m almost embarrassed to ask, but could you define “end of zipper” please? Is it the point where the foot can’t go any further, or the very bottom of the zipper tape?
Maqsood
May 7, 2012 #
We are manufacturer and Exporters of Tailor Scissors.
Any boby interested in this business send me e.mail at: dimaqsoodent@brain.net.pk
Joyce Rogan
May 14, 2012 #
Thanks for the clear and helpful video. But I am trying to put a zipper into a seam in a pillow that has welting around the four sides. How do you do that?
Joyce
Allison
May 22, 2012 #
great tutorial!
Jean
May 23, 2012 #
I have used invisible zippers for years I am 64 years old and am now teaching my granddaughter how to put in invisible and regular zippers. I have used many different sewing machines over the years and always used the plastic invisible zipper foot. I find it quite useful. I have never had any trouble with it. This summer we are going to spend a week or two putting nothing but zippers in scrap material both types of zippers, I concider myself quite capable of teaching her and others as I have been sewing since I was 11yrs old
I was taught by my grandmother. This tutorial is very well presented, it is well understood, and newbees will not have any trouble understanding it. Congratulations Job well done
Rachel
May 30, 2012 #
Thank you so very much for this tutorial. I have installed my very first invisible zipper — with the controversial plastic feet — with very good results. The zipper is even installed on the side-seam of a dress! Great tutorial….
Renee
June 2, 2012 #
Thanks so much for this tutorial! I actually dived straight in and decided to use an invisible zipper on my first ever sewing project and it has turned out perfect! Your instructions are very easy to understand even for a complete novice, I’ll be checking out all your other tutorials now… Thanks heaps ;-)
Angelicladydee
June 9, 2012 #
I have struggled with invisible zippers for some time now. Your instructions have really made a difference. What used to be a very difficult task is now an easy one. Your instructions are very easy to follow and produce desired results. Thanks for your unselfish publications of these instructions.
Angelicladydee
Southaven, Ms.
Erica
June 9, 2012 #
What drives me crazy about these tutorials, and the instructions in the book, is that the sample fabric you use doesn’t have an obvious right and wrong side. This means it’s harder for me to visualize what’s going on. Just an idea for future posts :)
Affordable
June 10, 2012 #
Nice tutorial. Thanks.
Nancy
June 13, 2012 #
Thank you very much for this tutorial. It was terrific in every way. I have the Bernina invisible foot and it worked very nicely. This is the first time that I have tried to install an invisible zipper (I have tried to read about it and watch some videos on line) but your tutorial was the greatest. As soon as I tried it – everything worked beautifully. First time on my muslin test ginger!!!!!!
Thank you ever so much and keep these easy to follow instructions coming. I shall use this method often – if not always.
PS love your patterns
Cheryl
June 25, 2012 #
Thank you so very much sharing with me on how to put in my very first zipper. I found your tutorial to be very helpful. Again Thank You!
Debbie
June 25, 2012 #
I also found the tutorial very helpful especially in completing the seams, I have run into trouble with puckering.
My bigger problem is after installation the zipper doesn’t run up and down smoothly and at least half the time the zipper splits and is not usable anymore
I’m wondering if how I press it is causing a problem or maybe the plastic zipper foot.
jenny
August 26, 2012 #
I’ve been sewing invisible zipper for years but I still learned something new from your tutorial! Thank you for showing how to finish the seam below the zipper. I’ve always tried unsuccessfully to meet the zipper seam to the rest of the seam and ending up fussing and spending way to much time trying to make It perfect. I used your tip on overlapping the two seams a bit apart and It worked perfectly!
angie
August 30, 2012 #
Thanks so much for the tutorial. I am returning to sewing after a 10 year hiatus and can’t recall if I’ve ever encountered invisible. The instructions on my pattern are incomprehensible so I’ve looked at several IZ tutorials on the web and this is by far the best. Bookmarking your site and will check out your other content for ideas and patterns as soon as I finish my current projects. Again, THANK YOU.
linda
August 30, 2012 #
I’ve been trying to get the whole zipper thing down for years and you’vve explained it perfectly.
Thank you
Helen
September 9, 2012 #
first time i have inserted an invisible zipper, with your guidance it was easy and it looks good. thank you
beth
October 3, 2012 #
I don’t have the fancy invisible foot but I’ve done fine sewing invisible zippers with a regular zipper foot. I find it helps to baste the stitch, then press it flat. It makes it easier to see where the coils need to line up. I pin them as described, and sew with the regular zipper foot.
Bernie
October 10, 2012 #
But how do you put an invisible zip into a lined dress?
Dorcas Prentice
November 12, 2012 #
This is an excellent tutorial, a really great help to me. I am a veteran sewer having been sewing for over 50 years but haven’t had much need for installing zippers, much less invisible ones with my recent sewing projects. It was so great to find this so quickly when I googled for help with this issue. The pictures couldn’t have been better and the written instructions were concise and easy to follow. I was sewing a bridesmaid dress for my youngest daughter, the dress and zipper turned out great thanks to your help!!!
Bernie
November 15, 2012 #
That’s great but it’s still not a lined dress!
Sarai
November 15, 2012 #
My book has some info on how to attach a lining to the zipper by machine. It’s actually pretty easy.
April
December 28, 2012 #
I just found this tutorial, obviously many months after the original post. I followed it to the letter and had perfect results the first time out installing an invisible zipper into a flocked taffeta skirt for my daughter. Also, for Caroline, in the months since she posted that there was no invisible zipper foot for owners of Viking machines, one has been introduced, part #413286545. Mine cost around $30.
Thanks again for sharing.
Sonia White
December 30, 2012 #
I have just done my second zip with your tutorial. I am so excited and thrilled with the result. Your tutorial was very easy to understand and follow. Thank you so so much!! I will NEVER go back to my awful attempts at an ordinary zip.
ABCameo
January 2, 2013 #
I have a question. There’s a home decorating fabric store nearby which is where I mostly buy my fabric. The material they carry is so beautiful and unique. I’m only interested in garments sewing and especially prefer creating one-of-a-kind boutique-type looks.
I made a top with an invisible back zipper out of a somewhat stiff home decorating fabric. Though I pressed several times, the fabric sorts of pops up slightly standing away from the seams where I attached the zipper. The zipper is in correctly, and the fabric looks really good since I also made pants in the same material, but it bothers me that the fabric doesn’t sit 100% flat when zipped.
Is there a way to make sure fabric sits nice and flat along the folds once the zipper is in place? Should I slip some fusible tape alongside the zipper and seam to keep the fabric down close to the zipper tape? Truthfully, I know I’m going to continue using home decorating fabric for my creations so I’m pretty sure this issue with “pop up” again. Many thanks for any advice.
Kittee-Bee Berns
January 23, 2013 #
Thanks for this, Sarai! Until today, I’ve been installing invisible zippers with a regular ol’ zipper foot, but I went over to the Montavilla Sewing Center (attached to Fabric Depot) and they were able to find an invisible zipper foot that works on my old Singer. So happy!
One question: On the Rooibos dress, you are supposed to sew about 1.5 inches of the side seam first, before installing the invisible zipper. Do you have any advise on sewing seams like this, that aren’t open at the top?
xo
kittee
Sarai
January 23, 2013 #
It’s basically the same process. You just want to make sure your zipper stop is aligned with the top of the opening, so there’s no gap. I like to stitch the tape at the top to the seam allowance as well, to keep the top of the zipper from flipping outward.
But installing it is really just the same!
Robin
March 9, 2013 #
Do I apply the neck facings before or after applying the zipper?
There is no mention of this in your instructions. I already put my
neck facings in. Now what?
Janice Linden
March 9, 2013 #
This is a great tutorial. I have put in many invisible zippers when I sewed construction in the 70’s and some in the 80’s but quit to work and raise my daughter and husband. I am now in my 60’s and went brain dead when my two grand nieces asked me to fix their skirt zippers, one regular and one invisible. The regular went well but then I totally forgot how to insert the invisible one. Thanks for having such a clear tutorial with great pictures. It keeps us oldies sewing.
Janice
Christine
March 14, 2013 #
This is very helpful, the little things make a difference, like ironing the zipper.
I have been having trouble with step 11 & 12, probably bc I am a beginner sewist. So what I have been doing recently is sew everything by machine except step 11&12. I mark the line, and hand sew for more precision so the zipper matches the seam, and I hand sew it 2x, so the stitches are strong.
Is that weird? Has anyone encountered problems with that? Someday, I will master being able to match the zipper and lines on the machine.
Laura Lee
April 18, 2013 #
This tutorial is great, but one question. The Laurel pattern, page 23 says to finish individual back edges before installing zipper. I finished my edges and now see these instructions using raw edges…what now?
Laura Lee
April 18, 2013 #
Never mind, I mixed up “finishing” with “stitching the seam”, I get it.
Holly
April 29, 2013 #
You lost me at step 10. Could you please re-phrase? The picture from step 9 and the end look exactly the same so I’m not sure what you’re doing in steps 10-12..
Helen
May 14, 2013 #
Brilliant thank you. I’ve been trying to follow instructions in my sewing book and got nowhere and your clear step by step instructions have really helped.
Colette
May 26, 2013 #
I have tried installing an invisible zipper foot twice now with the cheap plastic zipper foot I bought at the fabric store. It’s not working, the zipper tape shows through. I’m a fairly experienced amateur seamstress, but I cannot get this stupid thing to look invisible. I’m using a regular zipper, screw it.
Colette
May 26, 2013 #
(I meant zipper, not zipper foot.)
Colette
June 2, 2013 #
Wow, I tried it one more time and got it right, yay. The most important trick of it is to get the needle really close to the zipper teeth. Sorry about the earlier temper tantrum. I’m getting a better zipper foot. The plastic one I bought by the zipper display is just cheap junk, it makes it difficult for the novice invisible zipper installer.
Orlando Chiropractor
June 28, 2013 #
Hello, just wanted to mention, I loved this post.
It was practical. Keep on posting!
useful reference
June 29, 2013 #
Hi there to all, how is everything, I think every one is getting more from this site, and your
views are fastidious in support of new visitors.
Ann
July 20, 2013 #
This is the first time I have ever inserted a zip of this type although I do have many years of sewing experience. It was to go into my granddaughters satin bridesmaid’s dress.
I followed your instructions exactly and the result was fantastic. Amazing.
I was using a generic plastic foot (I bought specially, before I read the comments about the metal v plastic feet) on my Singer XL400.
I must admit that when I had finished I did think I had actually sewn too close to the teeth as the zip would not go up but a gentle touch from the iron sorted that out!
Thankyou so much from a very grateful English fan!
Allison
August 21, 2013 #
Hi,
thanks so much for the tutorial! I have a question in regards to the final look of my invisible zipper..I sewed as closely as a i could to the teeth as posible but there is still a huge amount of zipper on show on the outside of my skirt, is there better quality zippers than others? this zipper i got doesn’t really match my fabric that well so i am wondering what i can do. I have sewed invisible zippers in the past with no worries. thanks! Allison
sharvanna
August 27, 2013 #
this was a helpful tutorial. im making a chiffon circle skirt with lining and im not sure how to sew the zip. HELP!!!!!!!!!!! please
Linda
September 6, 2013 #
Glad I found your site. Excellent tutorial on Invisible Zippers.
Paulette
September 11, 2013 #
I have read and view several documents on invisible zippers and this is by far the best. Directions are clear and concise, pictures perfect. Thank you
sandy
September 24, 2013 #
Hello
I just started about a week ago on a dress for a client. It was a custom order, no patterns only a photo as inspiration… well… this dress became the dress of terror more than a couple of times.
I was even thinking about giving my client her money back….
Especially when I realized I had to give in and put a zipper in it…
Well… after lots of debating, Prayer and Patience I finally finished the dress! It turned out OMG super gorgeous! Especially since the placement of a zipper can “make or break” the garment.
Thanks to your tips in this tutorial I am so happy that “I Did it!” I actually did it.
I had done zippers before, but really never looked forward to them.
Always felt a tad bit intimidated by them.
I had several tricks but they were never really it.
One was… working on the wrong side of the fabric.
And zig zagging the space closed and placing the zipper over the zig zag. Pin, stitch and then take the zig zag away and voila… Well… it was never really done well 100% (And I am a perfectionist).
I had only the normal zipper foot “metal though” I did think “hummmm maybe I should get an invisible foot?” I did break the rules from a particular commenter and I DID IRON THE ZIPPER!
I loved that part. It made so much sense! Move the coils out of the way to actually get as close as possible. Yay!
The only part I still had a hard time with was the second part of the zipper… It felt weird…
However… My teen daughter looked with me and we did that part together.
I am super happy… This dress is gorgeous and it is covered with lots of lace and a lace train in an angle flowing down.
And now it will fit perfectly thanks to a zipper that no one can even see!
Thanks so much!
Sandy
P.s. My daughters’ middle name is Sarai as well. (A name you do not hear that often, but is so beautiful)
sandy
September 24, 2013 #
Oh, I forgot!
Would you please please please make a tut on another zipper placement with lining?
I think so many of us seamstresses would be so super happy!
Thanks a lot in advance.
Sandy
Susan
December 10, 2013 #
it worked! it worked!
thank you! : )
Jan Erickson
January 30, 2014 #
This was very helpful as I just purchased the invisable zipper foot but wasn’t sure how to properly use it. Thanks!
Lisa
February 11, 2014 #
How would you install an invisuble zipper on the side of a dress with a pocket?
Maxine Jones
February 13, 2014 #
I bought the plastic foot. It is actually consists of about three separate parts, and at least two of the parts tended to fall off while I was sewing . My machine is a Pfaff Dorina, and is older than the invisible zipper so I don’t know if there is a metal invisible zipper foot that would fit it, if there is I would gladly pay any amount – it’s cheaper than buying a new machine. Therefore, I am really interested in knowing how to stitch the zipper in by hand.
Louise
February 19, 2014 #
I found this helpful but the written instructions not so much. You say place the zipper down on the fabric which is facing up, but you do not explain that the whole zipper goes on the left side and that you then turn the other side of the zip to the right and sew it on the top of the zip -you just say sew it like this. it is not as obvious as you think.
Sally
March 1, 2014 #
Thanks I’ve just followed this word for word and it turned out great. I don’t have an invisible zipper foot so just used a normal zipper foot and stitched as close as I could get to the teeth. It’s not quite as close as the other foot would have been but its still good and once the fabric is pressed it covers any zip that might have been visible. I’m dead chuffed thanks!
Julie
March 8, 2014 #
Thank you so much, have never tried an invisible zipper before, but thanks to your instructions, it went in with no trouble at all!
I’ve never had a lot of success with ordinary zippers, so thought this would be out of my league, NOT ANY LONGER!!
monitoring
May 2, 2014 #
Does your blog have a contact page? I’m having
trouble locating it but, I’d like to shoot you an email.
I’ve got some suggestions for your blog you might be
interested in hearing. Either way, great site and I look forward to seeing it grow over time.
Jane
May 22, 2014 #
Thank you! I found this just in time as I was just about to put one in wrong. It worked fine with an ordinary zipper foot. I tacked the zip in place first as it was my first one and it made it easier to stitch. The only problem was that I was so successful in stitching right close to the coiled teeth that the velvet fabric I was using got pulled into the teeth because of the fluffy surface, so I had to re-do it and stitch slightly further from the edge. But with an ordinary flat fabric the first attempt would have been perfect. I’m delighted with the result.
Steph, if your students melt the zipper teeth, damage the ‘roll’ of the zipper and stitch over the zipper teeth, then perhaps this tutorial would help them.