
 Sign In

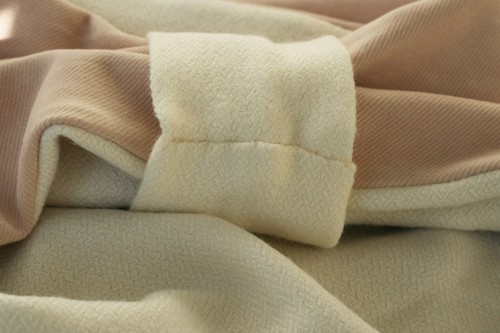
Winter Warmer Cowl


Winter is definitely here in Portland! We came up with this fun winter scarf to keep you warm during the short cold days. Using two contrasting wool fabrics, one particularly soft, creates a warm blanket for your neck and shoulders. We used some leftover wool herringbone (in white) and a brushed twill (in pink).
The cinched part makes the cowl look like a fun, oversized bow. Because this is a tube there’s a slightly tricky part when sewing up the short ends. Be sure to read through the instructions carefully before and while sewing. Take your time and you’ll be sure to get it!
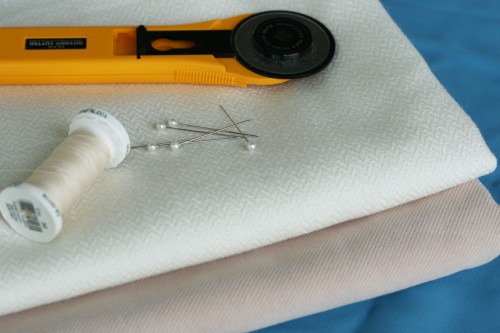
Items Needed:
37″ x 15 1/2″ main fabric
37″ x 15 1/2″ contrast fabric
10″ x 7 1/2″ main or contrast fabric
Thread
Pins
Rotary Cutter or Scissors

Cut out the fabric for the scarf body and the band.
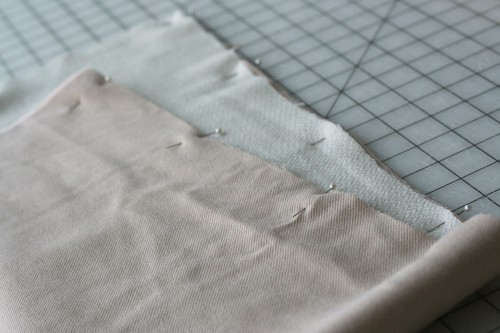
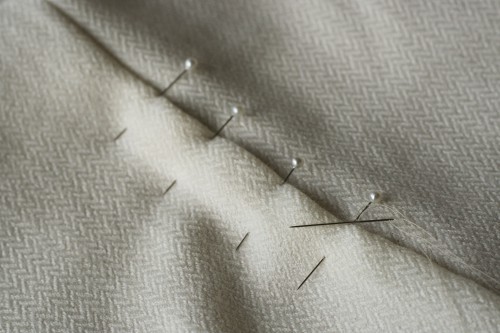
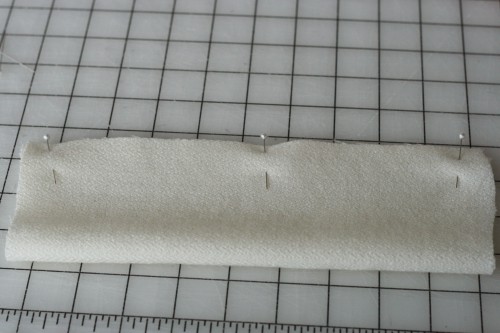
Right sides facing, pin the long sides together, leaving the ends open.
Using a 5/8″ seam allowance, sew up the long sides of the scarf. Press the seam.
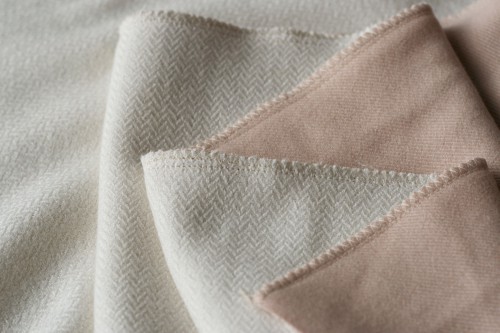
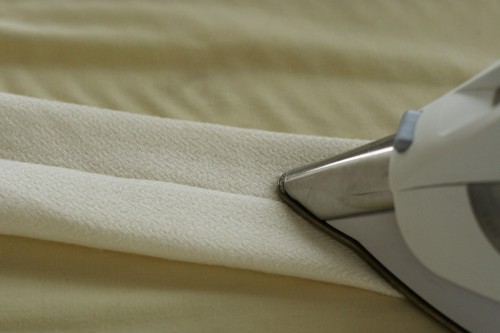
Finish your seams using your method of choice. Here we used an overlock stitch on the sewing machine. You can try a zigzag stitch, serging the edges or simply cutting the edges with pinking shears.
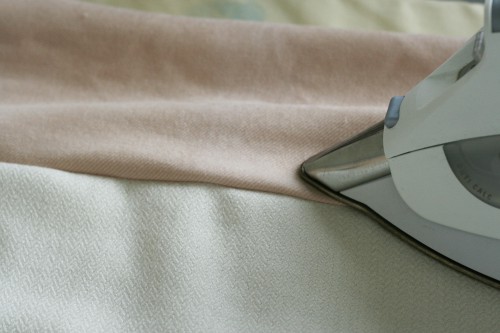
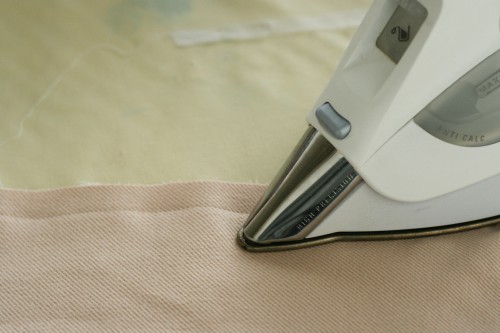
Turn to the right side. Press again.
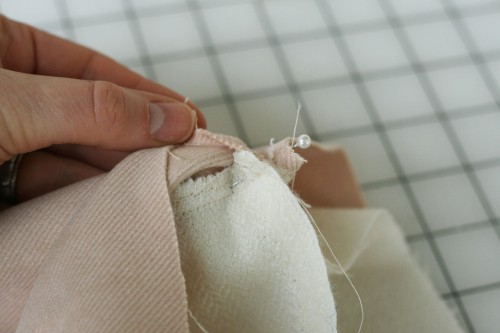
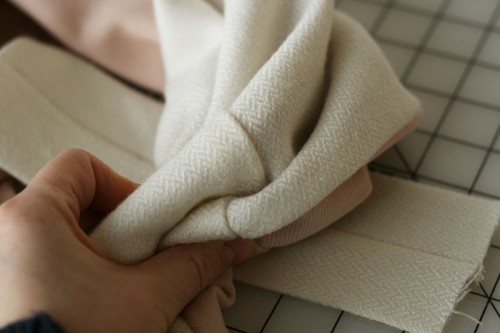
Fold the scarf in half so that the ends are on top of each other. Pin the seams together through two layers, leaving the out the contrast fabric.

Pin along the contrast fabric.
About 3″ out from the contrast fabric, pin the main fabric. Do this at both ends.
The scarf should look like a seashell.

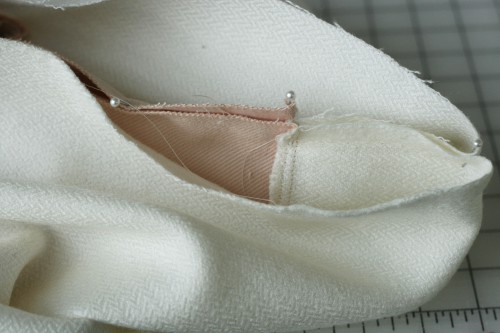
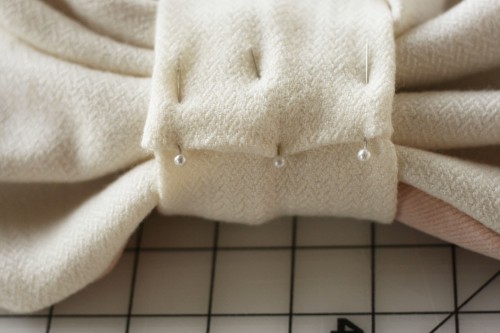
Start sewing at the first pin on the main fabric. Back tack. Continue sewing onto the contrast fabric and back onto the main fabric. If you are able to push the fabric through a little further, do so. Be careful not to stitch through more than two layers of fabric. Back tack when you finish the seam.

Now you still have a seashell, except it’s been sewn. See how the body of the scarf is coming out of that small opening? That’s exactly what you want.
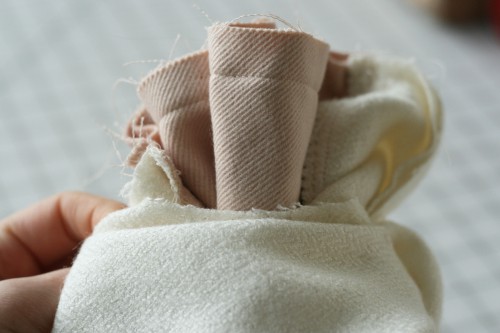
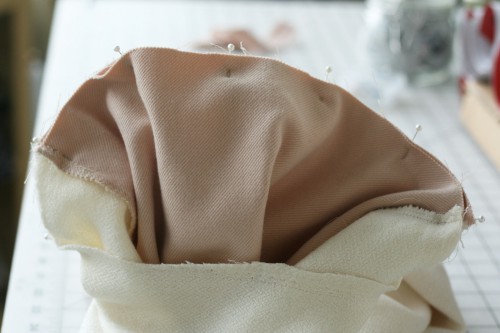
Snip the threads. Begin to push the seam you just sewed into the scarf, pulling the main fabric around it.
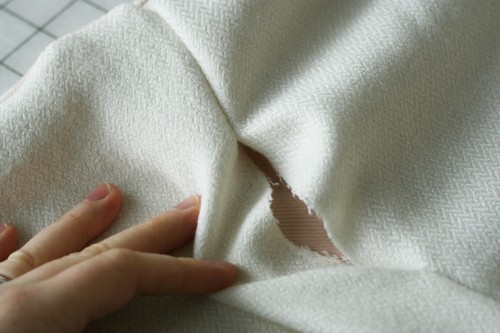
There will be a hole a few inches long on the side of the main fabric.
Match seam allowances on the inside and pin in place. Hand sew across using a slip stitch.
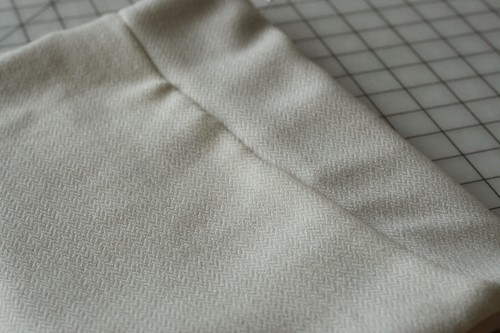
The seam is closed all the way around the cowl now. If there’s any puckering, don’t worry because it will be concealed by the band.
Pin the sides of the band together, right sides facing each other.
Sew up the sides. Pull the fabric through to the right side. Press the seam into the middle of the band.

At one end of the band, push the fabric in about 5/8″, forming a crisp edge. Iron it flat.
Place the band beneath the scarf, centering it over the seam. Pinch the scarf as you pull the band around it.
Push the unfinished edge of the band into the finished end about 5/8″, so one is encasing the other. Pin in place.
Here you can either slip stitch both sides or stitch through all layers. Here we used the slip stitch on both sides. Slip stitching all around produces a clean finish. Tack the band to the scarf.
Feel free to experiment with the width and height of the cowl. We love the bold statement this large scarf makes, but you may want it a different size to suit you. Remember that if you decrease the width, allow enough room for it to go over your head. Be sure to post photos of your projects in the Colette Patterns flickr group, we love seeing your creations!

Comments
Mia
January 13, 2011 #
I adore this cowl! I definitely plan on making one for myself!
Kerry
January 13, 2011 #
This is lovely. Would be perfect for a gift too.
junespoon
January 13, 2011 #
this is beautiful! I’ve made many knitted cowls, but never thought of sewing one!
lovely idea!
NancyDaQ
January 13, 2011 #
How adorable! I just love this and will have to make one!
Holly
January 13, 2011 #
This is really beautiful. I’ve been making a ton of similar “neck gaiters” out of fleece for kids, but this is such a pretty grown-up version. I’m a little confused by the directions on sewing up the tube, it is a bit different than the way I do it. The method I used is very simple. Once you have the long tube turned right side out, fold down one end like you’re turning it inside out again, but only halfway until the raw edges meet. Then sew around the raw edges (sort of in a circle) leaving an opening for turning. I THINK that results in the same finished product.
Jennifer
January 13, 2011 #
I love this! It is amazingly simple yet very elegant. Definitely something I must try making!!
Eva Vercauteren
January 13, 2011 #
This is such a lovely cowl. I also like the fact it can be reversed, gives the feeling you have 2 different cowls instead of 1.
Lovely tutorial, thanks!
Ashley
January 13, 2011 #
I really love this! Would look perfect with a cocktail dress for a winter night out. An amazing idea for leftover wool!
Something in the way she sews
January 13, 2011 #
This looks like such a great winter project, I’d love to give it a go.
Vicki
January 13, 2011 #
So pretty, Caitlin! It’s so elegant and ladylike… I’ll have to give this one a try.
Angela
January 13, 2011 #
Beautiful cowl… love the colors!
annette
January 13, 2011 #
How beautiful! I just might have to make this one!
Gloria
January 15, 2011 #
Absolutely lovely! This is now on my ‘to do’ list! Thank you for the tutorial.
Joanna
January 16, 2011 #
I need a little extra warmth these days. Thanks for the tutorial. I just so happen to have some wool that I was going to make some scarves out of for Christmas gifts. But, I guess I’ll have to just make them for myself :)
mes p’tits titis
January 18, 2011 #
j’adore, je vais faire le même ou presque
ALI
April 29, 2011 #
HI
Janee Lookerse
June 13, 2011 #
Hi!
I just wanted to let you know I referenced your DIY in my blog post today! Here’s the link:
http://yellowbirdyellowbeard.blogspot.com/2011/06/lists-day-13-diys-i-want-to-try.html
Thanks!
Janee
Heather(AKA)enjoycake
August 26, 2011 #
You know what this awesome cowl needs?…A hooded version I think if you did that it would look really cute and functional. I think this tutorial:http://www.allfreesewing.com/Accessories-to-Sew/Quick-and-Simple-Hooded-Tube-Scarf/ct/1
Could be used with the one on this site so you could have a hooded reversible scarf with the little decoration on the front maybe.
Janet
October 26, 2012 #
My measurements, given in a comment, provide enough length and width to pull over your head and fall in a couple of folds, but not too much, on your neck. that is, a hoodie.
Sylvie Créative
October 9, 2011 #
Really smart and cute!
Laura
January 24, 2012 #
This is the perfect project for not one, but two luxe fabrics I’ve been longing for! A gorgeous plaid shetland that I really can’t afford more than a yard of, as well as the gorgeous new Lou Louthi velveteens…Yay!
Nicole Smith
January 25, 2012 #
This is a really awesome and beautiful scarf! I am a site manager on Instructables.com. You should consider submitting this as an entry to our Sew Warm Challenge.
You can check out the contest here: http://www.instructables.com/contest/sewwarm2/
I would be happy to feature it on our site if you decide to post the instructions there and help get it noticed among our 13 million visitors. Let me know if you have any questions!
Best,
Nicole
Jan Baker
April 21, 2012 #
It is awesome. But listen: have you ever seen it pulled up, as a hood? That’s the kind I want to make. I saw, and bookmarked, the link that gave sewing instructions for a cowl that definitely can be worn up, as a hood. But I like this one better–the fact that’s it’s two colors is wonderful, the bow effect is elegant and feminine. But what happens to the look if you pull it up as a hood?
Sylvea
June 4, 2012 #
I would love to make this a bit larter so it could be pulled down around the upper arms.. wonder how that would turn out.
Jan Baker
June 4, 2012 #
37 X 15 1/2 is the original measure. I increased the 15 1/2 side to 26, to make a cowl possible. I love it! I made the center ‘bow’ out of leather, and the two fabrics are blue and white checked silk, with a white silk lining. It looks so cowgirlish! I wear it with my nice jean skirt. And I pulled the cowl up on the train and blocked the light and was quite private and peaceful. I like your idea! You’d have to leave the 15 1/2 width alone and increase the 37 inches. Don’t have a clue how much! If you had a piece of fabric you could play with, you could pin some trials and see how it fell. I think your idea is lovely. Your width would have to be more accurate than my experimentation, because mine could have just been too bulky (in fact, I think I had an extra inch or two too much), yours could fall right off your shoulders!
Janet
October 26, 2012 #
That is, I made a hood of it.
Jenna
October 26, 2012 #
Made this the other night and I LOVE it!! So easy and so chic. I used a black and white herringbone on one side and a camel-colored wool on the other. So fantastic! Thanks for the tutorial!
Janet
October 26, 2012 #
Isn’t it great?! I made a second one, out of taupes and greys and silvers in a seashell pattern and lined with taupe, very nice with my hair of similar shades. I get so many compliments on both my cowls, and one lady at church just about insisted I make her one, but I encouraged her to come to this site and learn how. Because half the fun is in the creative process, am I right?
Mathurine
November 28, 2012 #
Thanks! It’s so cute! Perfect for christhmas gift. Thanks a lot for your tutorials, this one and alls.
Merci beaucoup.